

Chapters

Learn what reactive programming is and how to create a real-time stock data project using RxJS and Next.js.
Processing a large amount of data is one of the key challenges for front-end applications, especially when these data require real-time updates. In the dynamic world of web applications, values often change rapidly, and managing this flow of information can be a complex task. So, how to effectively meet these requirements? What tools and techniques are best suited for this context? The answer to these questions lies in reactive programming, and key support here is provided by the RxJS library, which harmonizes perfectly with React.js, enabling the creation of more responsive and efficient user interfaces.
What is Reactive Programming?
Reactive programming is mainly based on real-time processing of asynchronous data streams. In this approach, streams are represented by special objects called Observables, which we can subscribe to and listen to emitted events. The Observer pattern is one of the main parts of reactive programming and is used to model data streams - Observable, Observer. However, reactive programming is something more than just a design pattern. It is a separate programming paradigm that allows us to build applications based on interconnected streams. Additionally, using reactive programming, we have access to many additional things such as operators that allow us to manipulate, process, and control the data streams. The main advantage of this approach is its scalability and performance.
To better understand reactive programming, we will create a simple stock data application using the RxJS library.
What is RxJS and why do we need this?
RxJs is a library for reactive programming. It provides tools for transforming and processing data streams. Below, I will briefly discuss some of them.
Operators in RxJs are simple functions that aim to transform or filter data emitted by Observable objects. We use them during subscriptions to these objects. We don't have to limit ourselves to only one operator. In RxJs, we can create whole sequences of operators where data from one operator is passed on to the next in the sequence. The full list of available operators is available here. We will look at one operator in detail, but I highly recommend you familiarize yourself with the rest.
One of the most commonly used operators is the map operator. The function passed to the operator is called on each value emitted by the Observable object, making it very easy for us to modify the data. Let's look at the scheme that describes the map operator.
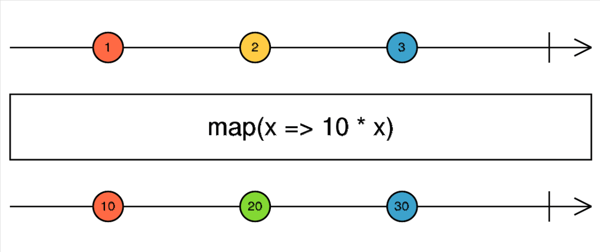 Map operator scheme
The horizontal line with an arrow represents the stream, and the colored circles are the previously mentioned events that are emitted over time. As we see, we can pass any transforming function to the map operator.
In the above example, we create an Observable object using the of operator and subscribe to it. In the first case, the subscriber will receive the original results, while in the second, they will be changed using the map operator.
We can combine operators in any sequence, and this is possible by the pipe function. The returned object is also an Observable object, allowing us to create new Observable objects anywhere in our application. Thanks to that we can share main data between individual modules, and perform calculations/transforms related to a specific module in a specific place.
As mentioned earlier, we can combine operators in sequences. Below is an example of such a case where we first map over all events transforming their value, and then using the filter operator, we extract only the elements whose modulo of number 3 is equal to 0.
Another important thing to discuss is Subjects. As we can read in the documentation, "A Subject is like an Observable, but can multicast to many Observers. Subjects are like EventEmitters: they maintain a registry of many listeners". But what exactly does multicast mean?
The stream starts emitting data only when something subscribes to it. However, what if there is more than one subscriber? It might seem that during data emission, each subscriber will receive the same value. However, not exactly. Because RxJs implements the Producer/Consumer pattern, each new subscription creates a new Producer underneath. Let's see this with an example.
At first glance, it might seem that each subscriber will receive the same random value. However, as we already know, each new subscriber creates a new producer that then emits value to its consumer. In such situations, where the stream logic is executed independently for each consumer, we have a unicast stream.
To make sure that each of our subscribers receives the same data, we can, for example, move the logic outside of the producer.
Data processing (in our case, just simply creating a random number) takes place regardless of whether any consumer subscribes to the stream or not so that when some consumers subscribe to our stream, they receive the same data. Although our stream emits the same data to all consumers, we cannot say that we have multicast because, as we know, there are as many producers as there are consumers.
Multicast streams can emit data to many consumers at the same time. In RxJs, we can achieve this thanks to Subjects. A Subject is an object that mediates between the consumer and the producer. It contains a list of consumers to whom it emits data after receiving them from the producer.
Commonly, we can say that the subject is a proxy between the producer and the consumer. In RxJs we can use several types of subjects, and the full list can be found here. One of the most commonly used is BehaviourSubject. The constructor takes the initial value as an argument. Subjects can also remember the last generated value. Let's see how it looks in practice.
During the creation of the subject, we pass it the initial value, so that the consumer will receive it after subscribing. Similarly, this is the case with our second consumer where although he subscribed to our subject after the value "d" was emitted, since BehaviourSubject remembers the last emitted value, our consumer will also receive it.
The subscribe function appeared in a few examples, which we did not discuss. What is this subscription? It is nothing but a process in which the subscriber follows what the stream emits. With the subscribe function, we can subscribe to a specific stream by providing it with a function that will be called for each stream value. Every time a value is emitted, our function will be called, with the latest stream value, which we can use, for example, to change the state in our application.
Stock data processing using RxJs and Next.js
Before we jump into the code, let's establish our assumptions. We want to create a simple application that will retrieve and display current data for a specific instrument using WebSockets. As an API we will use Binance API.
We will use the previously mentioned reactive programming library - RxJs, Tailwind CSS which will allow us to quickly style our components, and KLineChart - a financial chart library. The project will be created using the Next.js framework.
Before we start, we need to set up our project. Open any code editor and run the command pnpm create next-app --typescript. Let's install the mentioned libraries right away - pnpm add rxjs klinecharts classnames @heroicons/react. The installation of the Tailwind library is more complicated. A detailed instruction is available here. We are interested in steps 2-4.
Okay, we have our project and all the libraries we will need. Before we start coding, let's take a look at what the Binance API looks like. To display the so-called Candlestick bars, we will need historical information about the Klines. In the Binance documentation available here, we can see what a sample response from the endpoint /api/v3/uiKlines looks like.
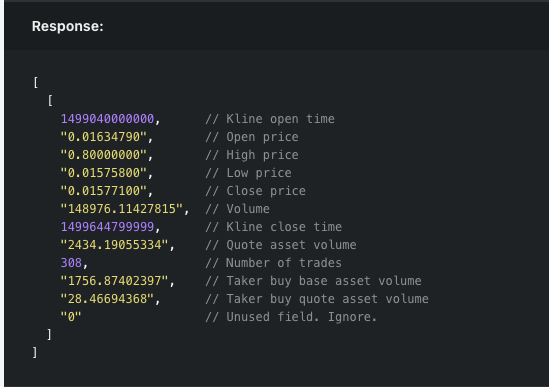 Kline/candlestick bars for a symbol. Source: Binance
To avoid CORS issues in communication with the API, we will use a Next.js feature called Api Routes. With their help, we can create our own API and expose endpoints.
So, in the pages/api folder, let's create a file called kline.ts. Export a function in it that will be a handler for the received request. Inside the function, make a request to the Binance API at the uiKlines endpoint and return the received response.
We have prepared the API route that will return historical information about the instrument to us. However, before we display our data, let's prepare a special class that will convert the array in such a way that next time we won't have to look at the documentation and check which place in the table corresponds to, for example, the High price value.
Let's create a components folder, and inside it, a file called types.ts. Inside the file, let's add and export a type called KlineDTO that will correspond to the interface of the received response from the API. Below, let's create the previously mentioned class named Kline. Each array received in the response will be converted to an object of this class. In addition to the constructor that takes 8 parameters (currently, we don't need all the information we receive from the API), the class will have a static method called fromKlineDTO that, when called, will create a new Kline object.
Let's create a component now that will display our chart. In the components folder, let's add a file called Graph.tsx. Create the component with the same name in it and render the chart using the KLines library. To display the chart, we must initialize it using the init method to which we pass the id of the element in the DOM tree. We also need to pass some data to our chart. We will store it in the previously mentioned BehaviourSubject. Outside of our component, create the subject and initialize it with an empty array. Also, create the fetchHistoricalKlines function that queries the previously created API routes and the getHistoricalKlines function that creates an Observable object based on the promise from the previous function using the from operator.
With the help of the map operator, we map the received array to objects of the Kline class. Call getHistoricalKlines function inside useEffect, and subscribe to the received Observable object. As a callback pass a function that will pass the received data to the Subject. Then also subscribe to that Subject, and as a callback, pass the function that applies the data to our chart. This way, every time the data in our stream changes, our chart will receive the current data. It should look like this:
We can now display our chart. In the file pages/index.tsx, remove the unnecessary code, and render our Graph component.
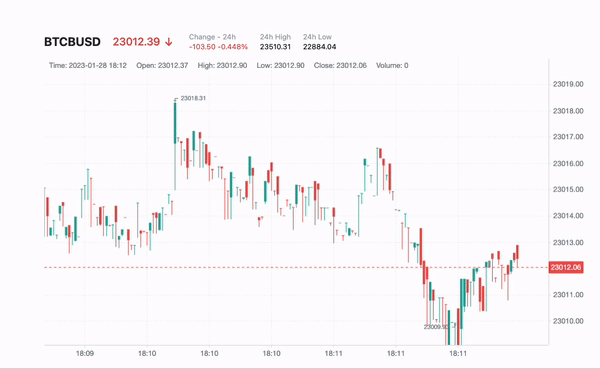
When we run the application, we should see the following view.
 Static Kline/candlestick graph
Okay, we are missing one thing. When we subscribe to an observable object, we need to unsubscribe it when the component is unmounted. We can do this directly in the useEffect in the Graph component, but to avoid unnecessary repetition in many places, we will create a dedicated hook that will subscribe to the received observable object and unsubscribe it at the appropriate time. So let's create a hooks folder and within it a file useSubscription.ts. This will be a simple hook that takes the observable object as its first argument and the setter as its second.
Let's now return to the Graph component. Refactor our useEffect and remove the current subscriptions. Instead, call our new hook with the appropriate parameters. The updated component looks like this:
We have our historical data, so our chart is immediately filled. However, we want to update it every second with new data. We will use Websocket for this.
Let's create a file StockWebsocket.ts and within it a class of the same name. In the class constructor, create an instance of the WebSocket that will initialize the connection to the Binance server. Also, add a subscribe method that will subscribe to the stream for the appropriate instruments and an onMessage method that will listen to the message event.
Before connecting to the Binance server, let's see what a WebSocket response looks like. The example can be found.
 Kline/candlestick bars for a symbol - websocket. Source: Binance
As we see, it differs significantly compared to the REST API that we used earlier. We no longer have an array, but an object with different properties. However, these are still letters that without knowledge of the API, don’t tell us much. No problem. To convert the object into a more friendly one, we will use the previously created Kline class.
Let's first update the types.ts file and add the KlineWsDTO interface. Then, let's add a second static method to the Kline class named fromKlineWsDTO that instead of an array, as in the case of the Rest API, will take an object from the WebSocket and create a new Kline class object based on it. Finally, let's create an interface of the data that we will receive from the WebSocket called Event. This will be a union of two types - KlineWsDTO and BlankDTO, as the Binance API, besides the data that we subscribe to, emits an object of type BlankDTO at the beginning, which we will want to filter out. Let's also add the isNotBlank type guard that checks if the object is not of type BlankDTO. The newly written code looks like this.
Let's do one more thing before creating the connection. The data from the WebSocket will also be kept in a BehaviourSubject. We will use them in many places in our application, so in the components folder, let's add an observables directory, and inside it, the store.ts file. Inside, let's create the kline$ subject and a special klineService object that will have a method, among others, to push new data to the stream.
Let's now go to the pages/index.tsx file and create the connection with Binance. In the component, let's add the useEffect hook, and inside, initialize the connection with the StockWebsocket class. Let's also subscribe to the appropriate data to the server and pass the callback to the onMessage method that will create a stream from the received response, filter out events that are not of type KlineWsDTO, and map them to Kline class objects. At the end, the received stream will be subscribed to and the emitted events will be passed to the kline$ subject. It looks like this.
Every second we will receive new data, and because we keep it in a stream, we can easily pass it to our chart. All we need to do is in the Graph component, below the declaration of the stream graphData$, subscribe to klineService, and pass the emitted data to graphData$.
After launching the application, we should see that our chart updates every second.
 Dynamic Kline/candlestick graph
Great, we have it! Let's add one more component that will display the current price and the change that has occurred in the last 24 hours. Let's look at the Ticker Streams in the Binance documentation. Once again, we see that the sample object has properties that don't tell us much.
Just like with the Kline, let's create an interface TickerWsDTO in the file types.ts and a similar class Ticker. Let's also update the type Event and add the typeguard isTicker that will allow us to check if a specific object is of type Kline or Ticker. The updated code looks as follows.
In the file store.ts, let's add the tickerService, similar to the kline, that will handle Ticker data.
Let's now update our file pages/index.tsx to push data to the appropriate stream depending on the type of data (Kline or Ticker). We will also subscribe to the websocket for the new type of data.
Add a new component using the new data. In the components folder, create a file named Value.tsx where we will display the current value of the instrument along with information on whether the closePrice value was higher than the openPrice or not. Create a component with the same name as the file and subscribe to the ticker$ and kline$ streams. Since we want our component to change based on the value dynamically, we need to place this information in the state. To do this, we create a new hook called useObservableState that uses the previously created useSubscription to subscribe to the stream and then updates the state. The new hook looks like this.
And this is the Value.tsx component implementation.
Also, add the Tick.tsx component where we will render the Value.tsx and display the rest of the information such as price change.
The final thing we need to do is render the Tick.tsx component in the pages/index.tsx file above our chart and launch the project.
Final thoughts
As we saw, reactive programming allows us to update the view in response to changes in data. In our application, each component subscribes to a specific stream and listens for incoming events, then reacts by changing its state and ultimately its appearance. There is no need to pass data through props, context, etc. Each component can individually subscribe to the streams it's interested in. This makes components independent parts of the interface, which can greatly simplify the implementation and maintenance of the application.
In the app we created, we mainly handled asynchronous operations from the server. We transformed data using various operators, subscribed to streams, and then reacted to them by changing the state of our components. In RxJs we can also handle events such as mouse movements, keyboard input, clicks, or other user interactions. We also can't forget one very key aspect that we haven't covered in this article, which is error handling. RxJs provides several operators that greatly simplify error handling. You can read more about them here.
Check out also:
- How to Add Payment Functionality in Next.js Apps Using Stripe - Learn how to create a simple donation button by integrating Stripe with a Next.js application.
- Page Animations in Next.js - What is Framer Motion? - Learn about Framer Motion, a powerful React library for animations.
You may also like

Choosing AI Development Partner: Beyond the Hype to Long-term Value
24 April 2025 • Patrycja Paterska


We’re available for new projects.
