


Chapters

Do you want to deploy your applications to tests in stores, but sometimes you need to call API on the staging environment or production? Find out how to do it without using third-party services — just Github, Fastlane, and yourself.
Why switch environments in React Native apps?
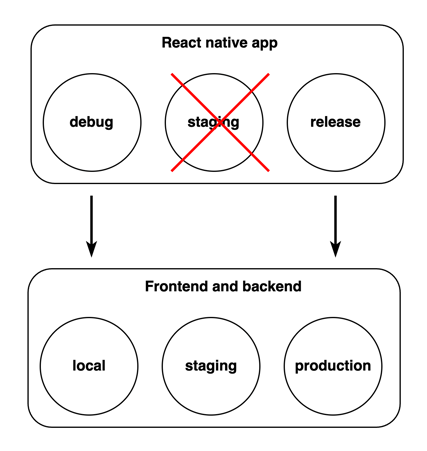
React Native (mobile) applications have two build modes - debug and release. When we deploy our application to tests in stores we use release mode and for local development, the app is launched in debug mode. Ideally, the debug app uses a local backend and the release app uses a production one. Frontend and backend apps usually have more environments: local, staging, production, and more if they are needed. Each frontend app has its API (local frontend uses local backend, staging frontend uses staging backend, etc.) and is hosted on a different URL.
 App environments
As you can see in the picture above, mobile apps have no staging launch mode. When we deploy release applications to tests in stores they usually use a production environment. Then we can test these applications in TestFlight and Google Internal Tests and if everything is fine, select these versions of the application to make it available to end users. Sounds great?
The problem is when we want to test our application (deployed to test lines in stores) with staging API. The problem is not just building apps but how to make different environments available in test lines in stores. We cannot “later” make staging versions available to end users, staging has to be available only for the testers group. Building two apps with different environments (one with staging and one with production) with every small update or fix doesn’t make sense either. We also do not want to use 3rd party solutions like Code Push (moved to App Center).
Building React Native apps for multiple environments
Application updates in stores available for end users usually do not appear every day. They are uploaded when new functionality or functionalities appear or something needs to be fixed. The idea is to build an application with a staging environment for every update or fix, so testers can check if the task is done. Then build an application with a production environment just once in a while, for example once in a week or something (but please not on Fridays 😀).
What is more, we want to release a specific version of the application with a production environment to end users. I mean the same state of code but with different data sources. On Github after every successful release with a staging environment, we can create a branch with a version name and treat it as a production release candidate. This will ensure that the production version of the application, we release, only has changes that have been checked.
 Process of creating release candidate for future build of the production app
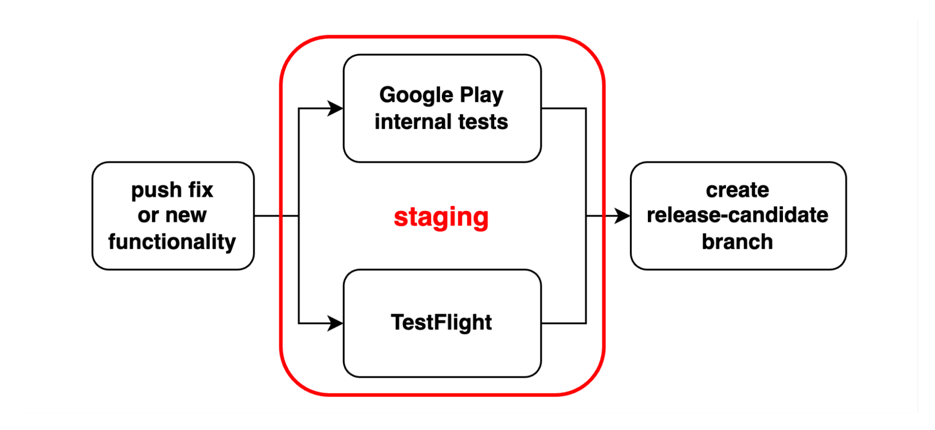
The process can look like just in the picture above. We push fixes or new functionality to the main branch on Github, then we build apps with staging environments: Android and iOS. When the development is finished and our apps are available for tests in stores, we create a release candidate branch.
Deployment to production
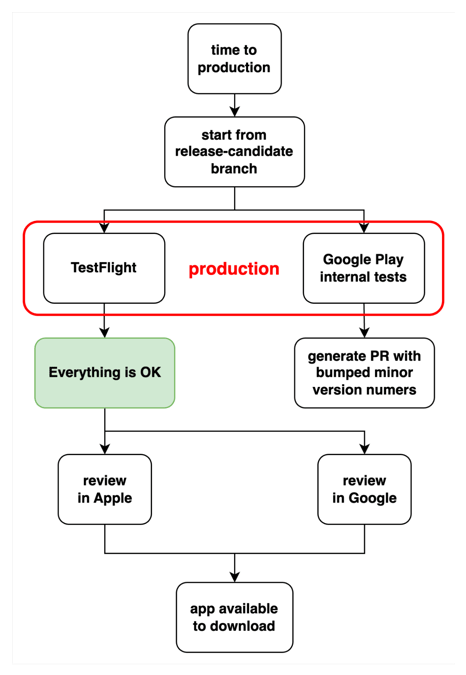
We have already prepared a release candidate branch, so we start from it. We build our apps with a production environment and put them in tests in stores. Testers can one more time check if everything is correct with production data. We have a green light to share this version with end users. In the stores, we select proper builds and start the review process. After some time, the applications will be available in stores 🎉
 Process of building and deploying production app
We have to remember also about bumping app versions and build numbers. Our idea is to bump patch version numbers when building with staging and minor numbers for production - to make it easier to recognize builds that use production data, but you can make it differently.
Automate the process of releasing React Native apps with Fastlane and Github Actions
We have an idea of how to resolve deploying apps with different environments to tests in stores. Now it’s time to automate it. Some time ago I wrote an article on how to deploy apps to test in stores so right now I will not present the entire application-building process, I will only expand it.

Update package.json scripts
Firstly, let’s add scripts that will trigger the production build. We have to change the bump version number to minor.
Build staging apps
Now, we have to update our Github workflow to make everything automatic for us. Let’s create a new workflow - deploy-mobile-staging.yml. After push to the main branch it will trigger build-and-test job and then publish-to-tests-on-google-and-apple. We also have to send information about the environment to the job that builds apps - here we will use staging.
We have to change the trigger of build-and-test. We want to start this job only when it is called from another job (deploy-mobile-staging).
Then let’s use information about the environment inside jobs that build and deploy applications. We have to set the job environment and use a different script from package.json when building the app ( with minor or patch version bump as we set up earlier)
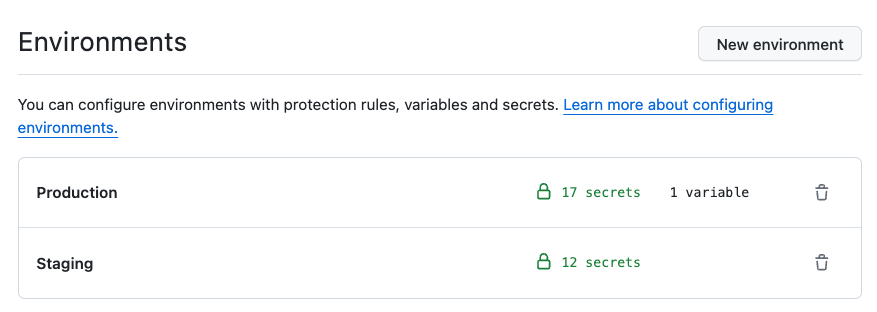
Next, we should update environment variables on github. This is just a simple project that does not use any outer API but usually, you would like to use different API urls on staging and production. So let’s imagine that you have an API_URL environment variable. Go to your Github repository settings and select Secrets and Variables in the Security section. Then choose Actions. Earlier we added variables to the repository but now we want to add them to Environment secrets. Select Manage Environment Secrets and choose the proper environment.
 Environment secrets on the Github repository
If there is nothing to choose from, please create a new environment first (Staging and Production). After that select Staging and press Add secret. Put API_URL as the name and your URL to staging API as value. Then do the same with Production. Thanks to setting up a job environment our workflow will know what secrets to use.
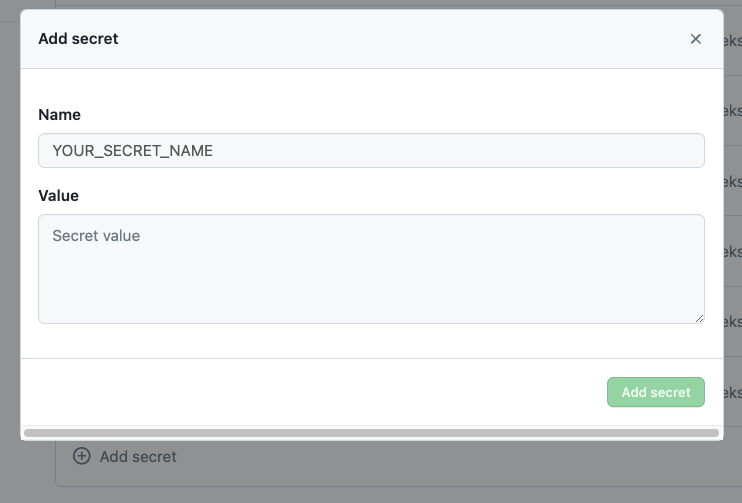 Adding environment secret on Github
Automatically create release-candidate
Right now we have a pipeline that builds applications with a staging environment and sends them to tests in stores. Let’s add the next job that will create a release-candidate branch for us. We also want to add a newly created version number to the release-candidate branch name. We have to update Fastlane scripts to get build versions from stores. What’s more, we will add new version names to Github envs (available in a current job) directly from the Fastlane script, so we can use them to create branch names. Let’s start with the Android part - go to android/fastlane/Fastfile.
Now, do the same in the iOS part - go to iOS/fastlane/Fastfile. To get the build number from the store, firstly we have to prepare the api_key.
Great, we have both versions exported as github environment variables directly from Fastlane lanes. Now we have to update our Github workflow to use them and create a release-candidate branch. Let’s go back to publish-to-tests-on-google-and-apple and add Android and iOS new version names as workflow outputs.
Let's add another workflow - prepare-release-candidate.yml - that will take our app versions and create a new branch with a name that will look like rc-android-1.0.0--ios-1.0.0. It will be our release-candidate. To do that we will use peterjgrainger/action-create-branch@v2.3.0 github action. It also needs GITHUB_TOKEN - this secret is automatically generated by Github at the beginning of each job, so you don’t have to worry about that, it’s available out of the box.
It’s almost done. Go back to deploy-mobile-staging.yml and add a job that will trigger creating a branch after successful apps deploy.
Yay, perfect. The first part is done. Now after every push to the main branch, the whole process will start - tests, apps building, and deployment with staging environment and then creating a release-candidate branch.
 Github workflow that builds and deploys staging application
Time to deploy production app
Deploying applications with production data shouldn’t be done automatically. I mean not fully automatically. We will use Fastlane scripts and github workflows to do it, but the first job will be triggered manually. Let’s create a new workflow deploy-mobile-production.yml. Firstly, it will run tests. If everything is fine, it will build and deploy apps to internal test lines but with production data. To do that we will use publish-to-tests-on-google-and-apple but with Production as BUILD_ENVIRONMENT.
Now go to your github repository and select actions. You should see an action called Deploy mobile production. Select this action. You can now trigger production build by pressing Run workflow and selecting branch. That’s the moment when you select the previously generated release-candidate branch. 😉
One more thing to do. Right now when we deploy our production app, commits with version bump will be pushed to the release-candidate branch. We have to manually create pull requests from release-candidate to main, but… We can automate that. Let’s go to deploy-mobile-production workflow and use actions/github-script@v6 github action. You can check in docs what params are available. I'll add a title, a body with information that this pull request is automatically generated, and several labels. I’ll also ask for a review from a person who manually triggered this whole production build process. This person should check if everything is fine and merge it.
Great, the whole process is done. We can trigger production builds. The workflow will run tests, build and deploy apps to tests, and then create pull requests to the main branch.
 Github workflow that builds and deploys production application
Your automatically generated pull request can look similar to that in the picture below.
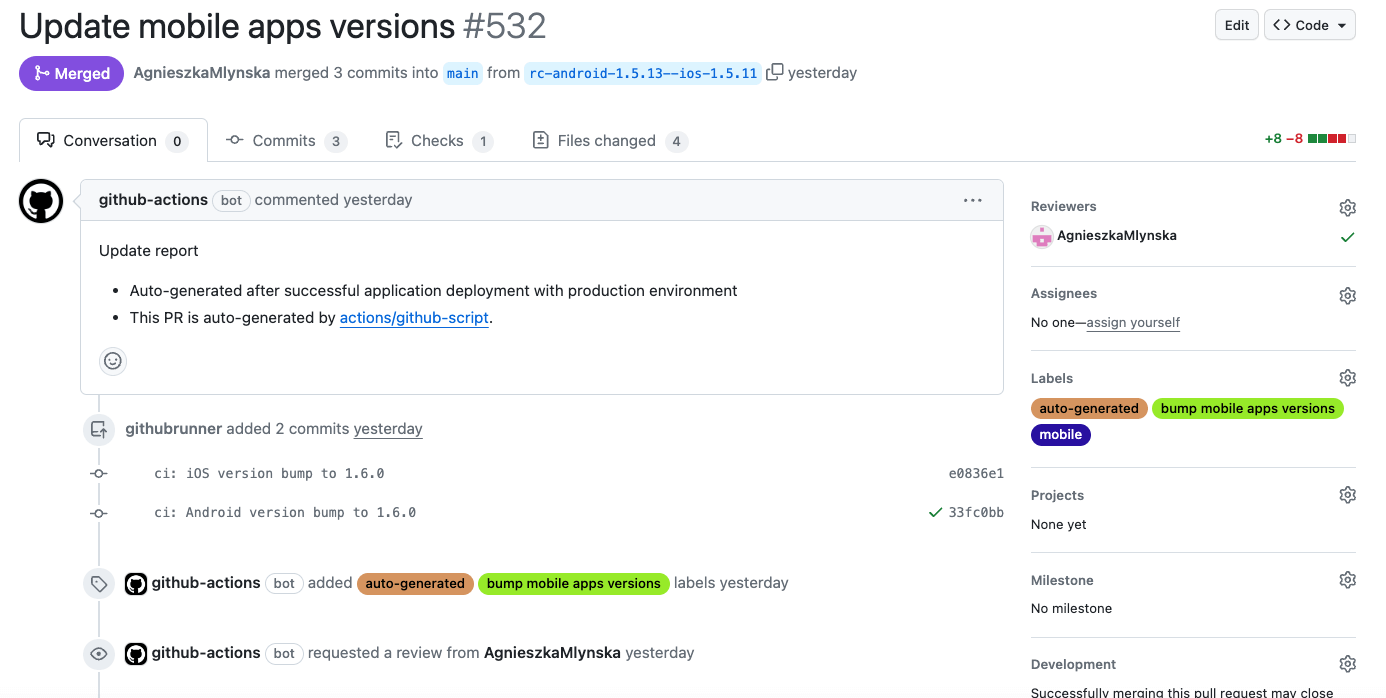 Automatically created pull request after successful production deploy
Summary
We have just created and automated the process for building and deploying apps with different environments to the internal test lines in the stores. No need to use additional services, just Fastlane and Github Actions. You can of course use some third-party solutions, but why?
We can recognize if the build is production or staging just by checking its version number:
- Production build 1.x.0 - always 0 at the end and bumped minor number
- Staging build 1.0.x - bumped patch version number
Maybe it’s not the ideal solution but it gives us the possibility to have these two environments available to check before releasing a proper app version to end users.
What is more, you have to make this setup only once. Everything is automated and you can now tell that “it did all by itself”. 🎉
Check out also:
- How to Make a Simple IMDb-like Movie App in Next.js? - When building an app you usually separate frontend and backend. What if you combine these parts using the Next.js framework?
- React Native vs. Native App Development: Pros and Cons - It’s never a one-size-fits-all when choosing between cross-platform React Native vs. native mobile app development. Establish your app’s priorities to benefit from the used technology.
You may also like

The Product Health Check: How to Find Performance Bottlenecks Before They Cost You Users
5 July 2026 • EL Passion

Staff Augmentation vs. Managed Teams: Which Model Saves You More on Long-Term Overhead
5 July 2026 • EL Passion
The Cost of Waiting: How Refactoring Your Legacy App Prevents Massive Technical Debt in 2026
31 May 2026 • EL Passion
We’re available for new projects.
