


Chapters
See how to create search interface quickly with Algolia InstantSearch.
In the previous article: Geographical Filtering with Algolia Geo Search, MapBox, and Next.js, we discussed how to filter our results based on the current geographical location using Algolia API. We also talked about what Algolia is and how it works. In today's article, we will use that knowledge but we will focus on another functionality provided by the Algolia team, namely InstantSearch.
What is Algolia InstantSearch?
InstantSearch is a UI library that allows for quickly creating search interfaces. It provides a ready-made set of so-called Widgets, which are pre-defined, ready-to-use blocks of code that can be immediately plugged into and utilized in our project. The widgets are also fully customizable. Additionally, we have the option to create our own widgets. More information on this topic can be found here.
In the React environment, the mentioned widgets are nothing more than components. Additionally, Algolia provides special hooks that make it even easier to compose or create custom widgets from scratch.
How to use InstantSearch in Next.js
In terms of the project, we will use the Next.js framework. We will not discuss the default project setup in Next, uploading data to Algolia, or basic integration with Mapbox. I assume that you are following me from the previous articles. If not, I highly encourage you to read how to create a custom map using Mapbox Studio and how to filter data on the map using the Algolia API.
To begin, we must first create an account in the Algolia panel and upload data. We will use the same set of data as in the previous article. A detailed instruction can be found here: Geographical Filtering with Algolia Geo Search, MapBox, and Next.js.
Let's start by installing the necessary libraries. In addition to the libraries from the previous article, we will need, among others, the react-instantsearch-hooks-web library. This is a library prepared specifically for the React environment and providing a set of predefined widgets and hooks. Additionally, we will also use Tailwind CSS. It is a library containing a set of CSS classes that allow for very fast styling without the need of creating style sheets. On the Tailwind website, there is a detailed instruction on how to install Tailwind in a Next.js project. Remember to add Tailwind's directives to the global.css file!
Okay, let's start coding! If you are following me from the last article, you should know that our data in Algolia looks like this:
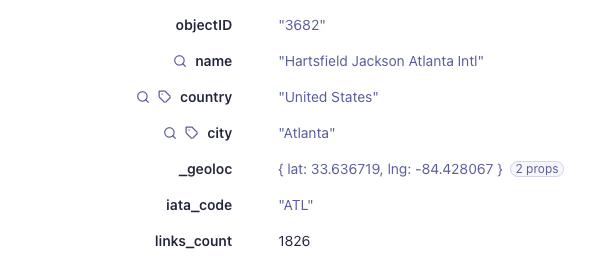 Source: Algolia
We have several fields available for filtering data. In addition to the _geolock field already used in the previous article, we will want to make use of fields such as name, country, and links_count, which for the sake of the example, we will assume represents the popularity of a given airport.
First, let's create an Airport interface that reflects the type of our data that we are holding in Algolia. We will need it in the next part of the post. So let's create a components folder in the main directory of our project, and in it, a types.ts file. The created interface should look like this:
In order to use the built-in widgets, they must be wrapped in a root component named InstantSearch which is responsible for communicating with Algolia. So let's create an AirportsSearch component that in turn will render the InstantSearch component. It will take arguments such as client and indexName, which are required to establish a connection with Algolia. Additionally, we will pass the children prop which will be needed to render the map and the list view. We will also use a Configure widget imported from the react-instantsearch-hooks-web library. It allows passing search parameters to Algolia. In our case, the only parameter we will pass is hitsPerPage, which specifies the maximum number of results returned by Algolia. We don't have to limit ourselves to this parameter. The full list of available parameters can be found here. The created component should look like this:
As we can see in the component, there are still three components that I haven't covered yet, namely CountryFilter, PopularityFilter, and CurrentFilters. Let's do it now.
The CountryFilter component is nothing more than a wrapper for the RefinementList widget provided by Algolia. According to the documentation, it is one of the most popular and frequently used widgets. It allows filtering data using a multiple selection list for a given attribute. In our case, we want the user to be able to filter airports based on the country in which they are located. I highly encourage looking at the documentation and the available props that the widget takes.
The PopularityFilter component is also a wrapper, but for the RangeInput widget. It's a simple widget that allows us to choose a range between two numbers. As in the case of RefinementList, we need to set the appropriate field on which it should operate. We also have to remember that this field must be numerical.
We must remember that for the above widgets to work, each of the used attributes must be added to the attributesForFaceting in the main Algolia panel. To do this, go to Configuration -> Facets and add the attributes as Attributes for faceting. In our case, it looks like this:
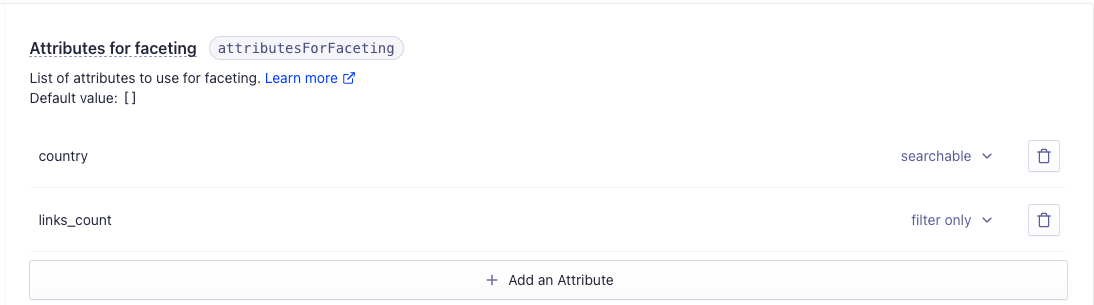 Source: Algolia
The last component is CurrentFilters. Similarly to the previous components, it is a wrapper for the Algolia widget. In this case, it is the CurrentRefinements. It is a very useful widget that displays the current filters.
Let's add the above components and render the AirportsSearch in the pages/index.tsx file. As props, pass the SearchClient and indexName created earlier, which corresponds to the name of our index in the Algolia panel. As children, render the map and list components that we will go through soon. The whole file looks like this.
Okay, let's move on to the Map. The component itself doesn't differ much from the one we created in the previous article. The only difference is how we obtain the data. In the previous case, we used the Algolia API to get new airports and render them on the map after each change in geographic coordinates. We used a custom-made AlgoliaApi class and the react-query library.
In this approach, we no longer need those things. We will still respond to changes in coordinates, but the aspect of data retrieval will be on the InstantSearch side. All we have to do is override our filters after each change in coordinates, and we will use the useInstantSearch hook to do this. The whole thing looks like this:
To make our widgets look nicer, let's also install the instantsearch.css package using the command npm install instantsearch.css and import the following styles in the _app.tsx file - import "instantsearch.css/themes/satellite.css". Let’s run our project and check how filters work.
 Source: Algolia
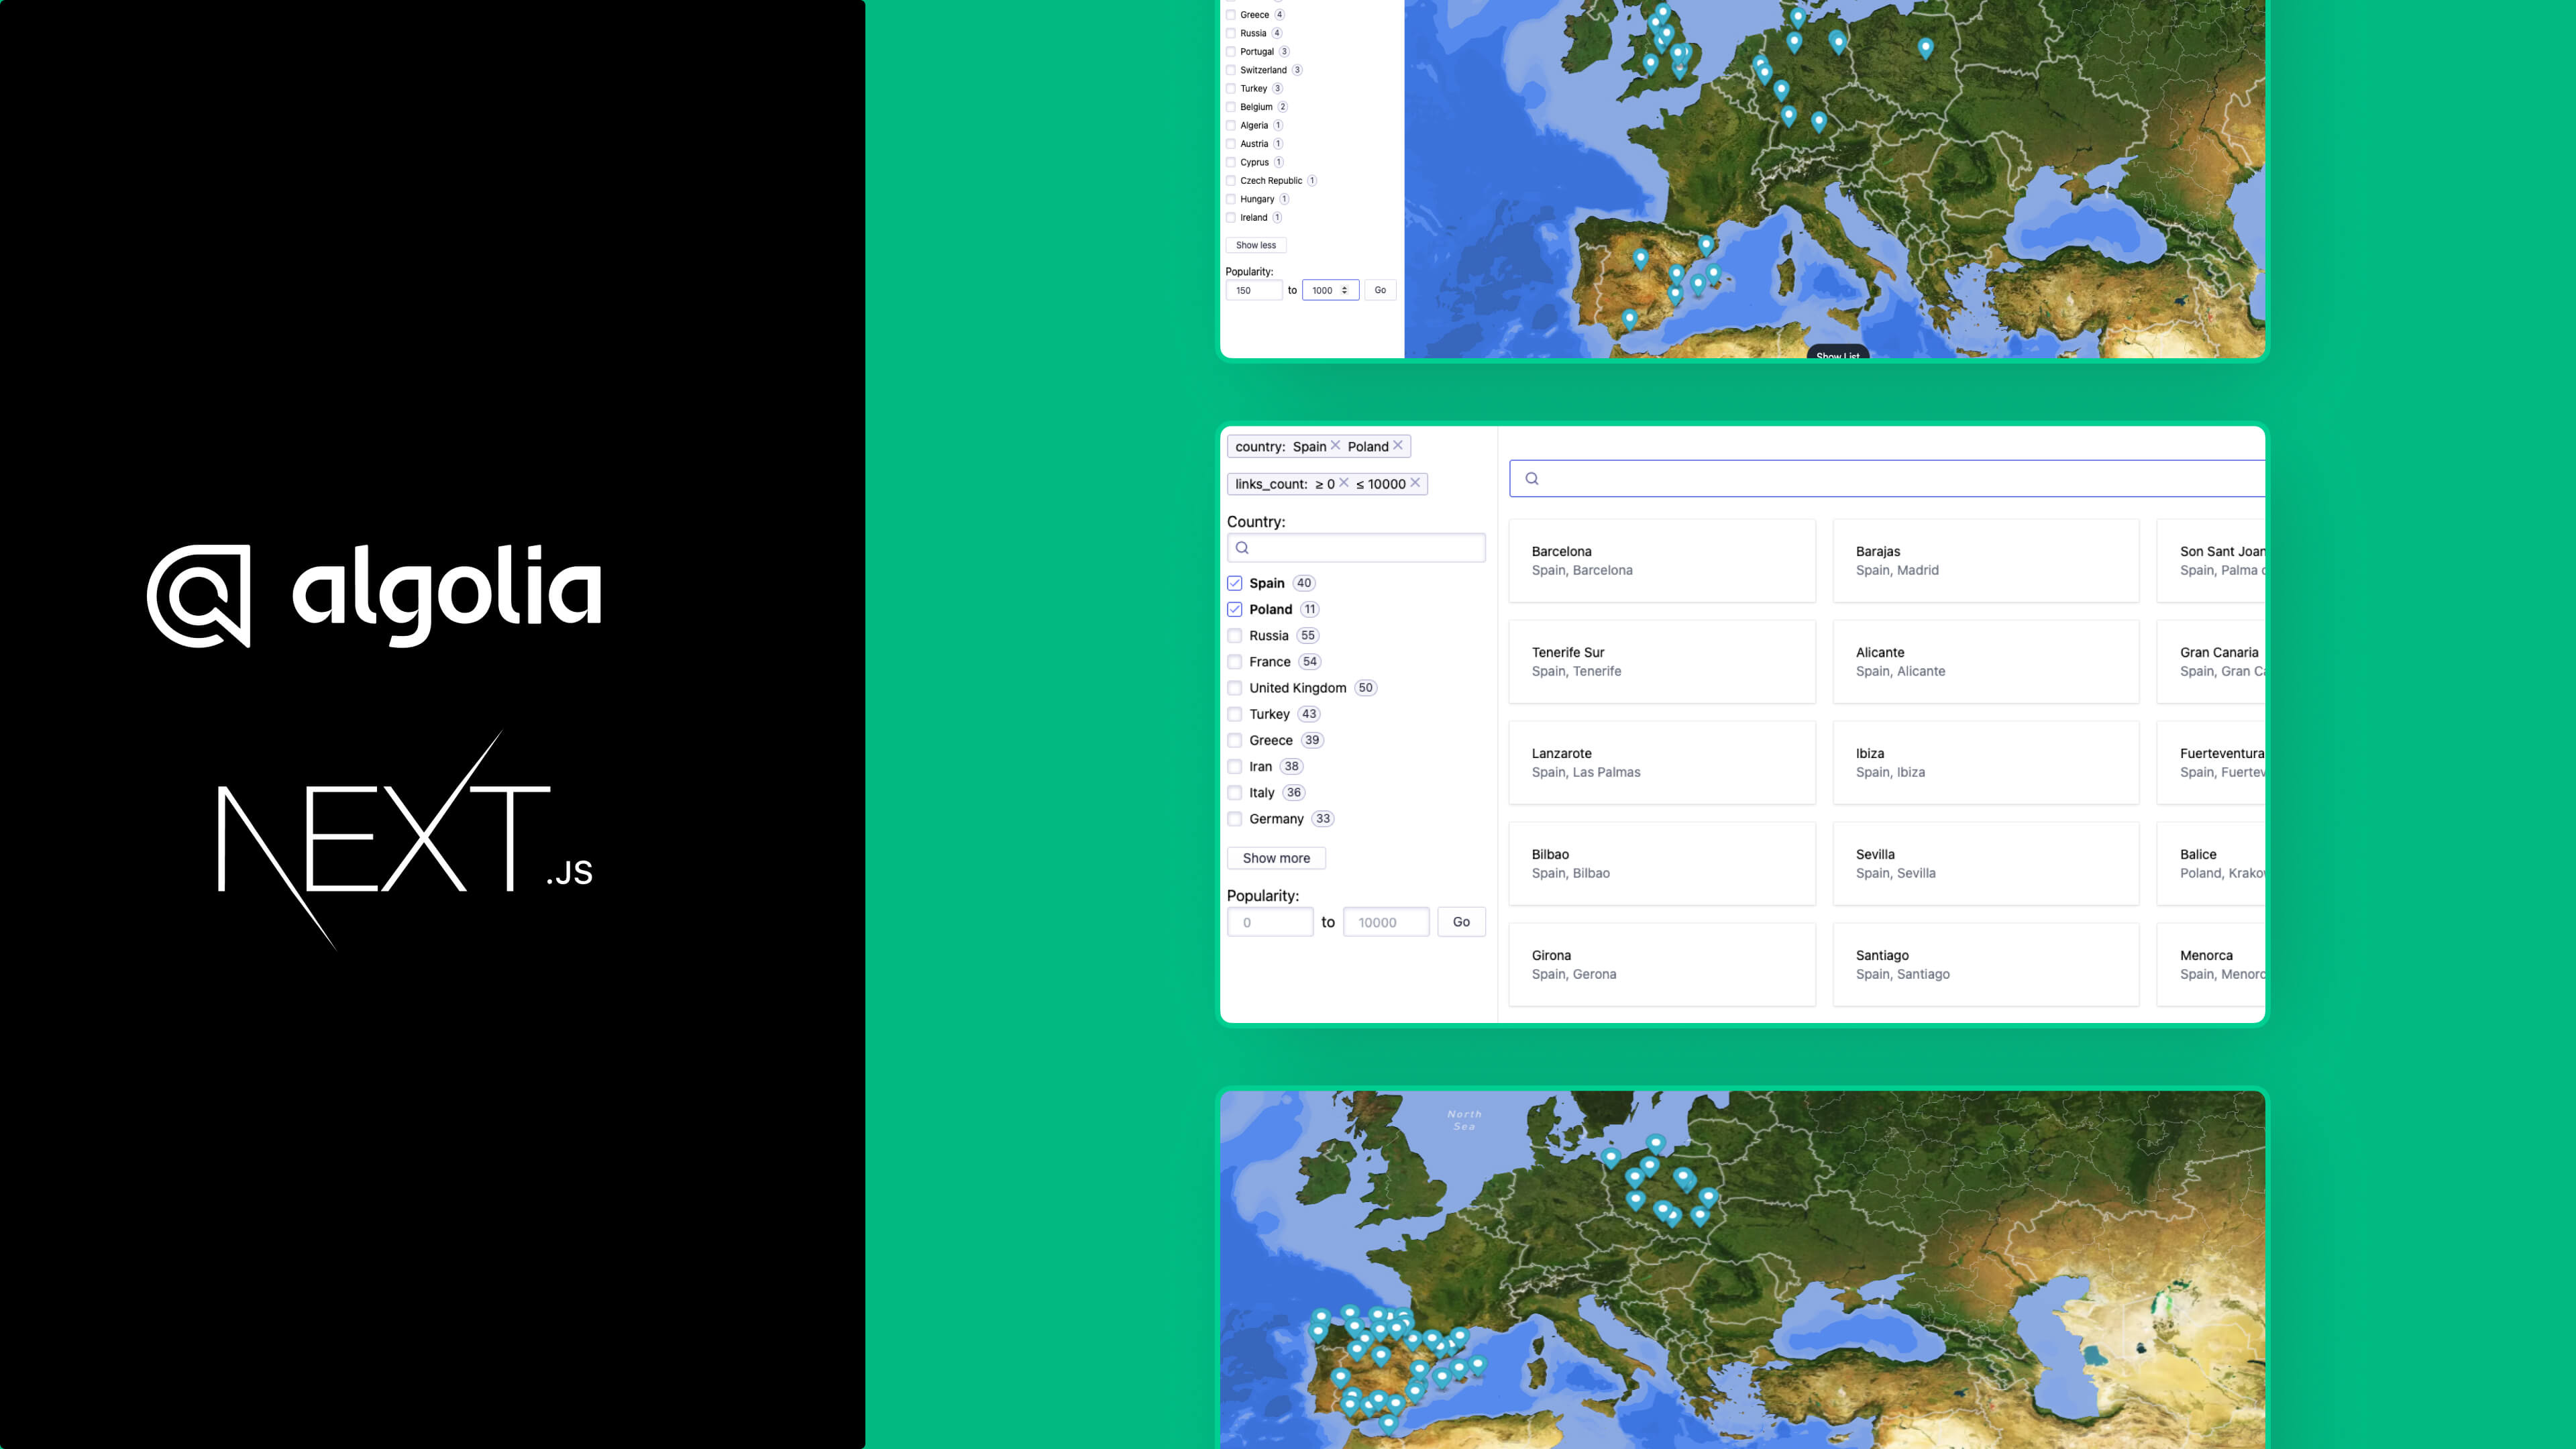
We got it! As we can see, our airports are filtered based on country, coordinates, and popularity. As we probably remember, we have one more component to create. Let's assume that we want the user to be able to view the airports in a list form as well as be able to search by name, in addition to the map.
So, let's add an AirportList component and render it in the index.tsx file just below the map component. The component itself will consist of a few things. The first will be a button that, when pressed, will display or hide our list. The second thing will be a SearchBox widget that will allow users to search for airports by filtering them by name, for example. The third thing will be a Hits widget that displays the list of results obtained. It can take the hitComponent prop as one of its parameters, to which we can pass the component that should be displayed for each rendered record. The last thing will be the Pagination widget. The whole file looks like this.
And that's how our list works:
 Source: Algolia
Final thoughts
Algolia InstantSearch is a library that allows for the quick creation of an entire system of interactive search with minimal effort. As we have seen, the implementation is very simple and InstantSearch is very well optimized for speed. Algolia also supports other frameworks such as Vue or Angular. I strongly recommend taking a look at the available options in the Algolia documentation and experimenting with them again.
See also
- Geographical Filtering with Algolia Geo Search, MapBox, and Next.js — See how to display data and implement Geoserach on MapBox map using Algolia.
- Custom Maps in Web Applications Using Mapbox and Mapbox Studio — A step-by-step guide on how to create custom maps using Mapbox and Mapbox Studio.
You may also like

The Product Health Check: How to Find Performance Bottlenecks Before They Cost You Users
5 July 2026 • EL Passion

Staff Augmentation vs. Managed Teams: Which Model Saves You More on Long-Term Overhead
5 July 2026 • EL Passion
The Cost of Waiting: How Refactoring Your Legacy App Prevents Massive Technical Debt in 2026
31 May 2026 • EL Passion
We’re available for new projects.
