


Chapters
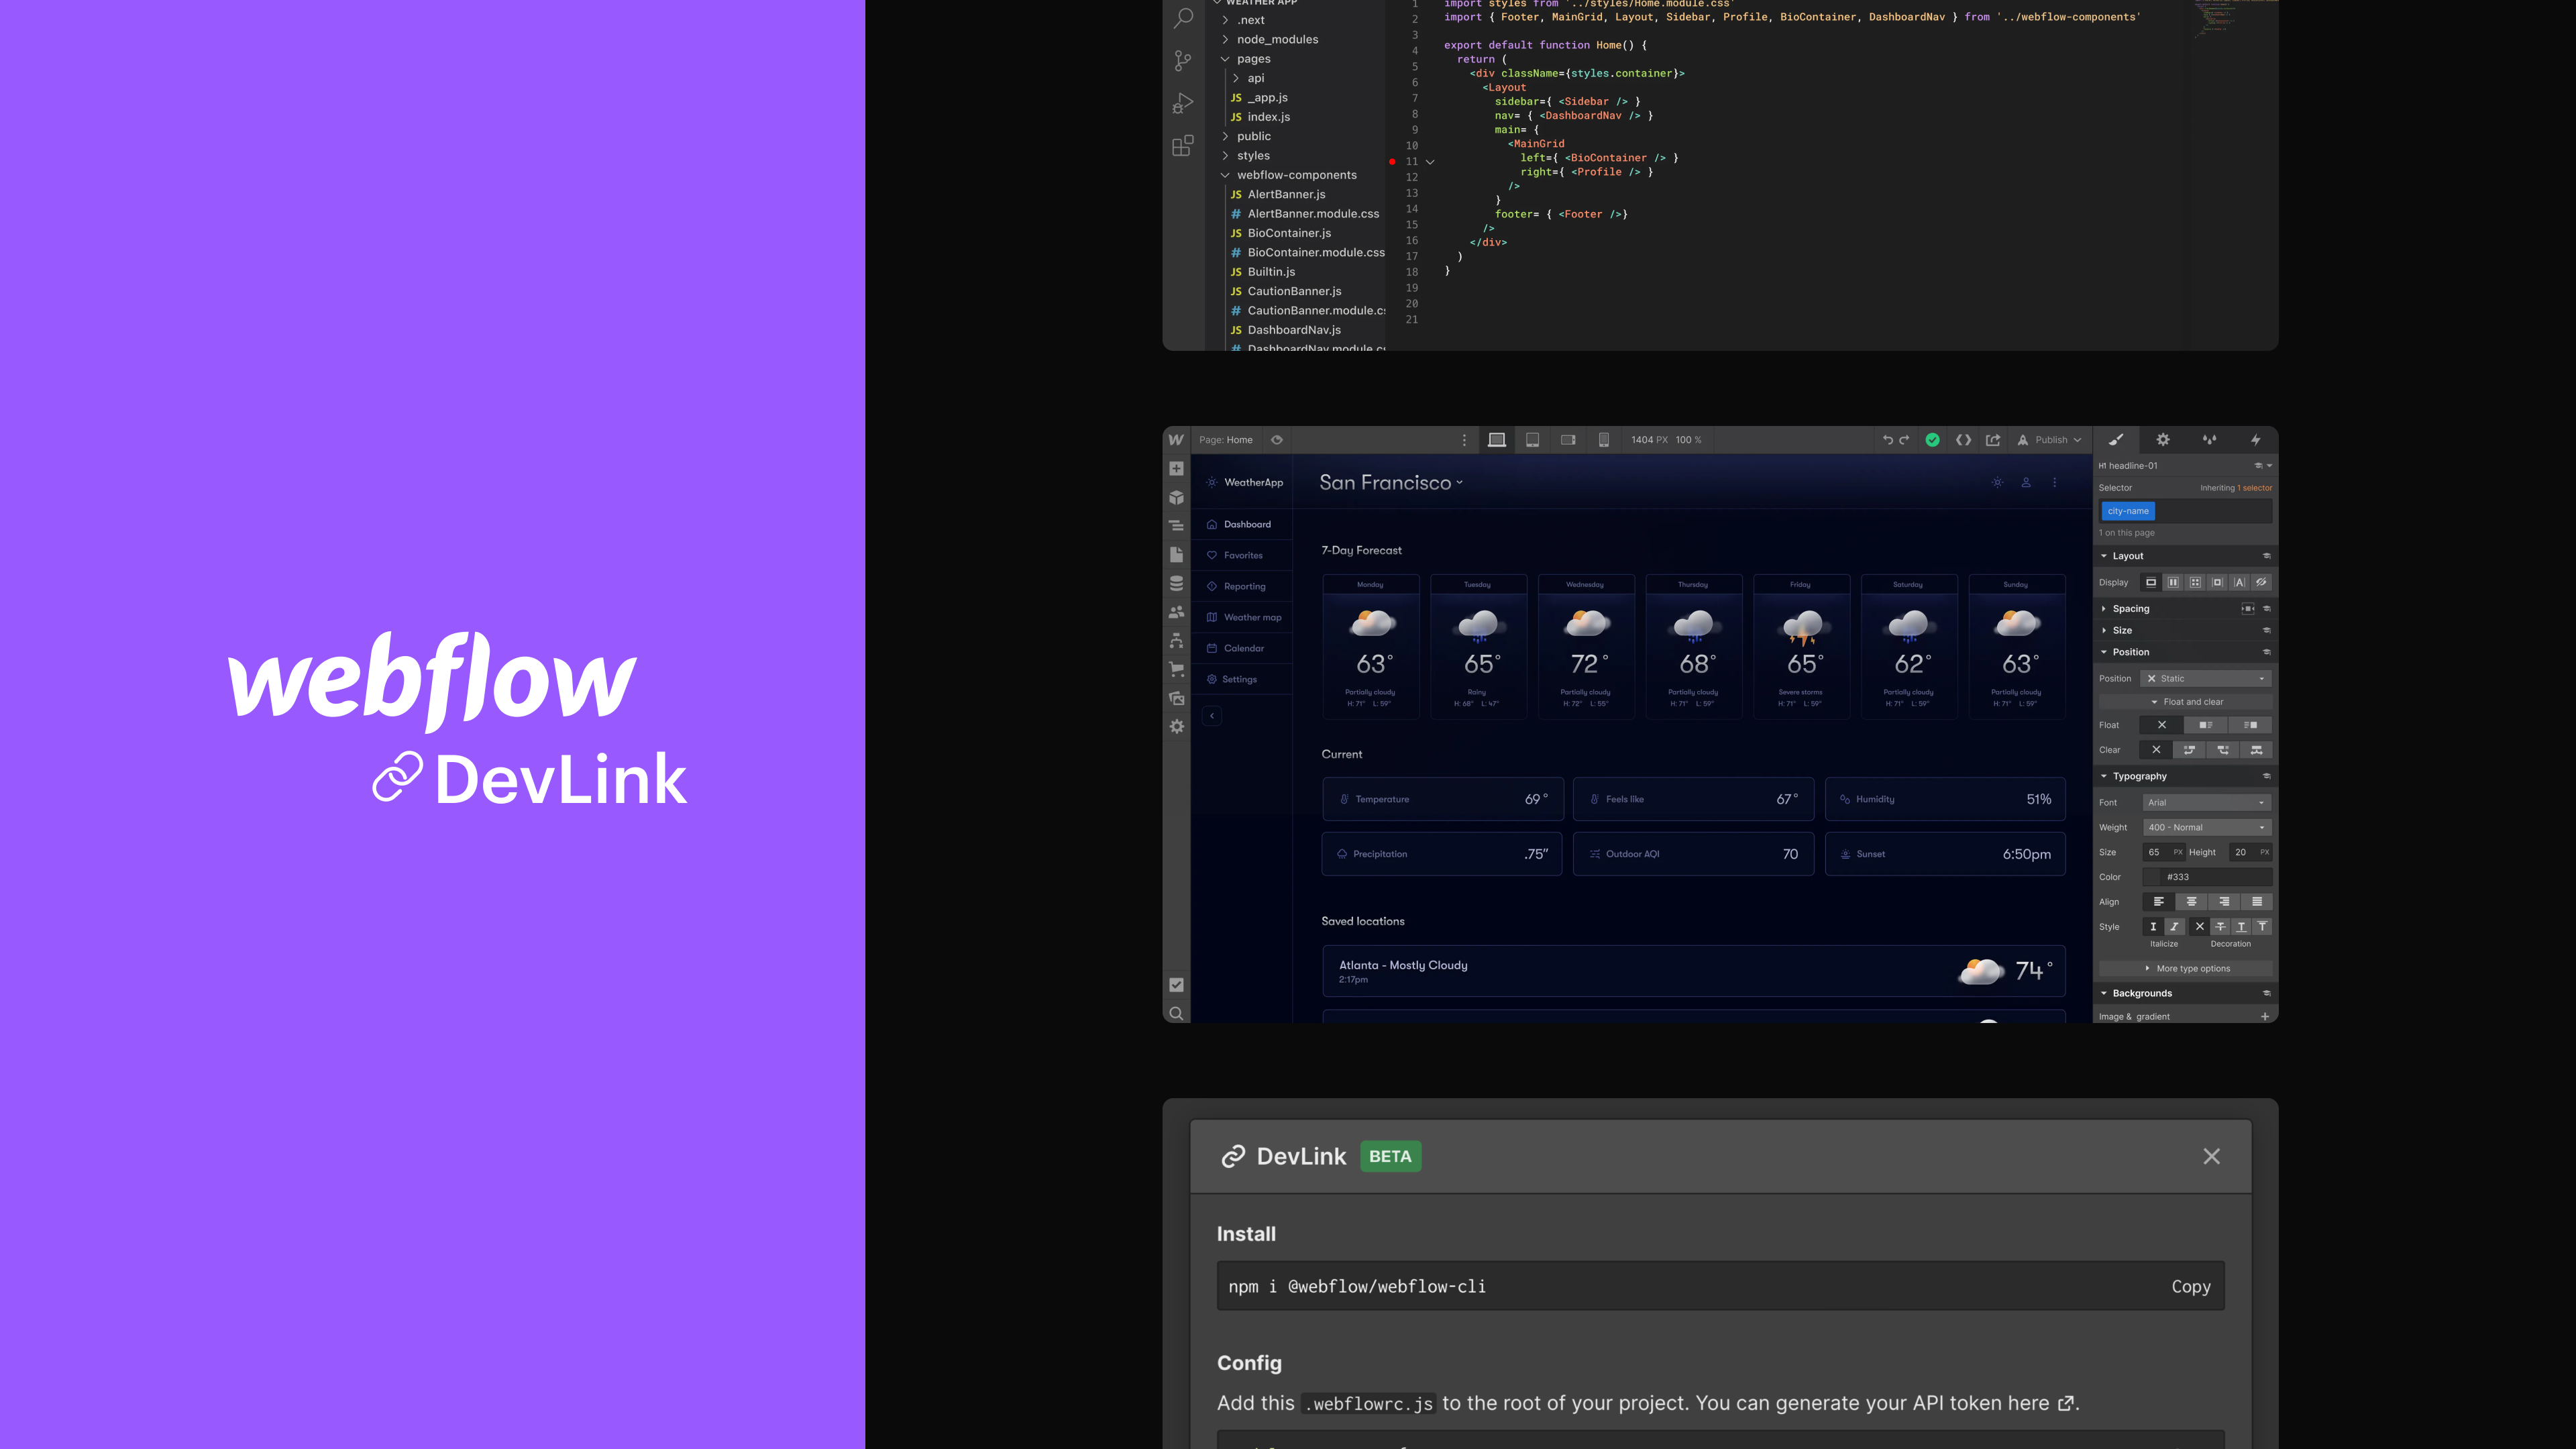
DevLink, a new feature from Webflow labs, takes no-code to React in seconds. Our Design Team Lead & Frontend Developer tested it, so you don't have to.
No-code and low-code tools are becoming more and more popular, and with the increasing competition in the market, also more thoughtful, developed, and equipped with new solutions. One of them is DevLink, released in early June 2023, a new feature from Webflow Labs, which takes the code generated on the basis of no-code tools to a higher level.
What is DevLink?
DevLink is a feature that allows you to generate code in React.js based on components created on Webflow in no-code mode. Previously, there was an option to download the code of the created page, but it was written in plain HTML, which generated a lot of work if you wanted to integrate it with an application written in React. DevLink is designed to simplify this process by creating ready-made React components.
We wanted to find out how much this solution actually facilitates the development process, whether it speeds it up, and how it affects its quality. For this purpose, a pricing table was designed, containing three price cards, which we intended to transfer to our project written in React. In the article, we will share our impressions of using DevLink from the perspective of both a designer and a programmer. We used the premiere free Open Beta version, emphasizing the importance of the API access token for seamless integration and workflow streamlining.
First step: Webflow designer's perspective
Michał Mazur, Design Team Lead at EL Passion
One of our Webflow templates included a pricing table section, which seemed like the perfect candidate for a basic test. It required some nested components, but it didn’t require extensive interactive functions, such as drag&drop or data input. It’s basically a couple of static elements laid together.
hen I dove into the DevLink documentation, I must admit it all seemed relatively straightforward - right-click on an element, select 'Create Component', or even create a nested component, and create props for all of the data injected into it in React. Webflow has put a lot of work into making the Props linking as simple as possible and it pays off - it takes only a couple of minutes to do it, especially that I already used the linking feature so many times with Components and CMS Collections in Webflow.
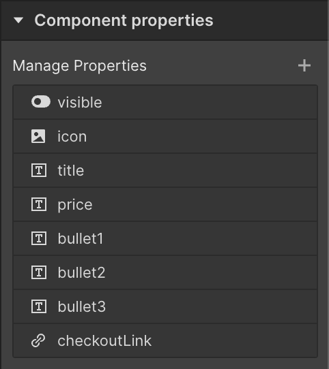 Setting up component properties in Webflow
However, as a person without any React experience before, I had problems grasping the concepts of Slots and Runtime props to be set in Webflow. I knew that Zuza, our front-end developer would take these components and refactor them anyway, so I needed to sync with her a couple of times to make sure I set everything up in the right way. Even if I wanted to preview the React code, I couldn’t do it without setting up the environment of a basic app, which is an area outside of my field of expertise.
Seeing it live
Once I set everything up and shared the code, there was nothing left for me but… to wait for Zuza! Once the app was deployed and font issues were resolved (more on that later), I could see our design, styled perfectly, along with transitions and responsive values. Any change I made could be synced immediately and reflected in the app, which transitions some of the responsibility back to me, as a designer. However, the results on the development end of things were perhaps not as positive.

Second step: downloading and using generated code
Zuza Napiórkowska, Frontend Developer at EL Passion
When we started our experiment, I knew absolutely nothing about DevLink except that its essence is to generate code in React based on components created in Webflow. Webflow itself was also not very familiar to me - I once took some time to see what it was all about, but I definitely wouldn't say I'm proficient at it. It turned out that I don't need to know about this tool at all, and what's more, I don't even need to have contact with it.
Set up and getting to know the tool
For our DevLink experiment, I created a new, clean project in Next.js where our components will be displayed. I used the most up-to-date version of Next.js at the moment - 13.4.5.
The first thing I did, of course, was to look at the documentation. It turned out to be quite friendly - not too long and written in a clear and transparent way. Its small volume is due to the fact that DevLink is just not a complicated feature and there is not much to explain here.
Downloading the code turned out to be trivial. In order to download the components previously created by Michał, I had to create a .webflowrc.js file in the root of the project and paste the Webflow project config generated by Michał into it. Already at this stage, we can choose what extension the generated files should have - by default it’s .js, but DevLink allows you to replace it with .ts, .jsx, or .tsx.
Then it was enough to just use the command to install webflow-cli in the project and use the next sync command to download the code for our project, consisting of 3 components, previously named by Michał: PricingTable (table containing 3 cards), PlanCard (single card) and BulletPoint ( item in the "includes" list). Webflow also allows the designer to create Slots that allow you to simply add any children to a component, but in our case, this wasn’t needed.
Within a few seconds, a DevLink folder appeared in the root directory, containing the code of the components that make up our pricing table written in React.js - and more. The folder contained many different files, including styles or type code. To add global styles to all pages, I imported a global.css file in Next.js.
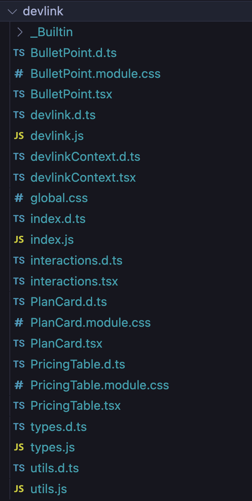 Generated files
Generated reusable components code example - Pricing Table
Working on the generated code in the development process
Not focusing on the quality of the code for the moment, I tried to test whether it works as intended. In order to display our component in the desired form, we had to do a few things first, apart from importing it to the selected page and adding it to the page structure. Following the instructions from the documentation, I imported the styles and added the DevLinkProvider in the topmost project file (in the case of Next.js version 13, its layout.tsx) to wrap the entire application code with it.
Then I added the Pricing Table component to the home page of the project and displayed it.
Almost everything displayed fine - the only problem was with a font imported from Google Fonts that didn’t work - but it was easy to deal with - all I had to do was move the import of the font from the global.css file from the DevLink folder to the globals.css file for the entire project.
At this point, it’s worth looking at how exporting components from Webflow and adding styles to components from Webflow was solved. In the DevLink folder, there is the main global.css file mentioned above, but in addition to it, there is a separate CSS module file for each of the created components. This structure eliminates the problem of overwriting styles for the rest of the application. On the other side, it causes slight chaos in the code structure, if we generally don’t use CSS modules in. In the case of the tech stack currently used in our company, it is even more noticeable, as we use tailwind for styling. Support for styles through CSS modules can be turned off by adding the "cssModules: false" field to the config, but this may lead to unwanted overwriting of global styles.
I started to dig deeper into the structure of the generated code. I have to say that I have mixed feelings about the way of typing: for each of the .js files containing components, a .d.ts. declaration file is created, in which there are function declarations containing props of the created components. Types from the .d.ts file are imported into the component file. The solution works, of course. Type files are also generated if we don’t choose the option with TypeScript as an extension for component files, but as we’re used to using TypeScript interfaces in projects, this solution again causes that our potential project to lose consistency.
Support for Next.js
However, I have to admit that I was pleasantly surprised with support for Next.js tags such as <Image> and <Link>. DevLink allows you to use them in the code by using your own custom renderers in the provider in the form of components built from these Next.js tags and assigning them to props.
Designers and developers can be finally in agreement
What should be given to DevLink is the fact that it solves one very common problem - the discrepancy between the designs and their implementation in the code. In a situation where the designer is able to create a fully styled reusable component, the programmer has nothing to do in this field except to make sure that everything works as it should (and as we can see in our font example, it’s not always worth blindly trusting automated solutions). This eliminates the problem of code incompatibility with the designs, which is often frustrating for both designers and developers.
.png?width=200&height=113&name=will-webflow-replace-developers).png)
Where opportunities exist, there are also limitations
While downloading the code from Webflow to our project is a child's play, transferring changes made to the downloaded code back to Webflow is simply ... impossible. Unfortunately, at the moment DevLink doesn’t allow you to push the code back to Webflow, even if the changes we made would concern things available on Webflow (e.g. minor CSS changes). This seems to be quite a complicated thing to make it work this way, so we shouldn’t expect such a functionality in the near future. The plans so far include such facilities as support for other frontend frameworks or integration with the storybook.
DevLink also doesn’t allow you to export some of the page elements created on Webflow, such as Collection List, E-commerce elements (Cart, Add to cart, Web Payments, PayPal), Lottie Animations, Lightbox, Form submissions notifications, memberships, and logic.
Be careful with the sync
It is also worth paying attention to the process of downloading the code itself. In the earlier part of the article, I wrote that it is enough to create a config file and run the code syncing command. Everything is ok if we want to download all components from the project and this is our first sync in a given project. However, DevLink gives us the opportunity to download only the components we choose from the project. And here, as it turns out, you should be especially vigilant...
If you want to download only selected elements, all you have to do is add the field "components: ['componentName’]" to the config. Restarting sync, even if limited to selected components, will overwrite the entire DevLink folder containing the previously downloaded source code and just remove components not included in the config file. So you have to be especially careful when using it because if we don't create a commit or move the contents of the DevLink folder elsewhere, and we make changes to the code of the components (e.g. adding functionalities that are not available in Webflow), we can accidentally stupidly lose our work. But here, too, it can be partially circumvented - if instead of setting selected components in the config, we add their names to the command that downloads the code from Webflow, we will only overwrite the files related to the selected components.
I also think it’s a small shortcoming that, yes, we could download e.g. only the PricingTable component, but it would be downloaded exactly the same way as when downloading all components - it would contain 3 PlanCard components, which in this case we do not import, which will cause an error in the application.
Can DevLink improve my work?
After getting to know how DevLink works, we asked ourselves if it could improve our daily work and speed up the development process. We didn't have high hopes, as it's still not too much-tested novelty - and unfortunately, we encountered a lot of things that rather lead us to leave DevLink as a cool feature that may be useful to someone - but not to us.
Components created by DevLink are unfortunately not very legible compared to those written directly by programmers. They have dynamically created class names based on the names created in Webflow, and even simple components themselves have quite a large volume.
Code consistency and synchronization
Introducing changes in styling locally wouldn’t be very pleasant here, and in addition, each change introduced in the code causes the code is no longer consistent with the online version on Webflow and further syncing of components is no longer possible. Needless to say, this is something that unfortunately discourages us from using this solution, especially since introducing possible changes to the styles in the code can also be quite annoying here, considering the structure of the files.
The inability to synchronize the code with Webflow after introducing local changes to the code also prevents any refactoring of the downloaded code (e.g. to improve readability, make the code consistent in the project, or organize the file structure) if we are not 100% sure that we won’t want to fetch changes from Webflow in refactored components in the future.
Let's look at an example of our PlanCard - it contains 3 separately pasted BulletPoints that have directly given props. If, for example, we wanted to map an array containing data to BulletPoints, then again - after introducing such a change, further synchronization with changes potentially introduced on Webflow would be impossible.
Impact on Project Structure
If our project has a specific structure (and in the case of Next.js projects, such a structure usually exists), then unfortunately it will also suffer from the use of DevLink. It’s true that we could move our DevLink folder to the components folder, but we have no way to achieve a state where, for example, each component will be contained in a separate directory - DevLink generates a lot of common files, such as utils.js (all of them can be seen in the screenshot closer to the beginning of the article) without which the components won’t be displayed correctly.
And there is still the issue of overwriting components during sync - a solution is to change the name of the DevLink folder to another one so that the components don’t overwrite themselves, but here again - if we’ve already made changes to the components, we will have to move them to the newly downloaded component, which means we would have to duplicate our work.
Unfortunately, the above arguments mean that DevLink is unlikely to be implemented as a new solution to speed up the programmer's work, because on the contrary - in the case of a project written in the standard mode - yes. it could actually speed up this work, but at the same time make it more difficult.
So who is DevLink useful for?
Of course, I can see situations where DevLink turns out to be a super useful tool - after all, it's not a feature made just for fun, but to speed up the website development process.
It seems that it makes the most sense to use DevLink when we simply build the entire website in WebFlow, we create its most targeted version, and then simply introduce in the code functionalities, that Webflow doesn’t support (of course, taking into account that if we change something in design on Webflow and we download it from scratch, we will lose the changes made locally). DevLink allows you to easily extend Webflow functionality by having, for example, so-called Runtime Props for individual elements that support functionalities available from the code level for given components (e.g. event handlers). Unfortunately, it is not possible to add props in the form of objects, which again increases the size of the code.
Hypothetically, DevLink can also be useful for building individual parts of the website at the last minute - if the client requests a certain element of the website in a short time, and we don’t have programmers' free hours for that, the designer can build such a component on Webflow, and the programmer will have to just download it and display it in the right place on the page. It can be a fallback solution to achieve MVP in difficult conditions, but it’s hard to say that it's an optimal solution…
Michał’s perspective
From my point of view, DevLink would be a promising tool for designers and Webflow developers to ease into understanding React a bit better. When learning a new skill, any automation and bridge from your current expertise areas work to your advantage.
With DevLink, I could potentially see myself experimenting with React and building a very simple app myself, without the need of learning advanced techniques in CSS, for example. Just like Webflow Designer is a tool that helped many designers learn CSS and HTML, I feel that DevLink (with a bit more development and documentation) could do the same for web app development.
Summary
At the moment, it seems to me that DevLink is not a solution that can improve the work of a programmer who writes code in a standard way on a daily basis. However, it’s a very nice solution if you want to extend the possibilities of websites built from scratch on Webflow. Previously, it was also possible, but not in the form of React components, and this definitely makes it so much easier to add any logic.
DevLink is a really cool thing if we built our website entirely on Webflow and want to add some functionality to it. As a supplement to projects written in a standard way, however, it seems (for now) to be a too chaotic solution and in most cases, it would probably affect the quality - consistency, and readability - of the code in a wrong way.

You may also like

The Product Health Check: How to Find Performance Bottlenecks Before They Cost You Users
5 July 2026 • EL Passion

Staff Augmentation vs. Managed Teams: Which Model Saves You More on Long-Term Overhead
5 July 2026 • EL Passion
The Cost of Waiting: How Refactoring Your Legacy App Prevents Massive Technical Debt in 2026
31 May 2026 • EL Passion
We’re available for new projects.
