4 March 2022 (updated: 4 March 2022)
How to Improve Core Web Vitals of Your Website Using Next.js
Chapters

Next.js gives us hybrid static & server rendering, automatic code-splitting, image optimization, and more, while being fairly easy to pick up. You can improve Core Web Vitals just by using it properly.
Web performance is a wide and extensively covered topic. There are numerous ways to measure performance of your website or app, and there are even more tools helping not only to measure, but to improve the performance, depending on your exact case and priorities. Fortunately, web developers’ lives became a bit easier recently, since Google introduced Core Web Vitals in May 2020. While they might not cover all possible performance problems, they are a straightforward indicator of how users perceive your website or application.
What are Core Web Vitals?
Let’s see what Core Web Vitals actually are and what they measure exactly.
- Largest Contentful Paint (LCP): measures loading performance and reports the render time of the largest image or text block visible within the viewport. This is probably the main content user wants to see on the page.
- First Input Delay (FID): measures interactivity and reports the time from when a user first interacts with a page (e.g. clicks a button) to the time when the browser is able to begin processing event handlers related to this interaction. It reflects how fast a user can perform an action on the page and see a result.
- Cumulative Layout Shift (CLS): measures visual stability and is an aggregate of unexpected layout shifts. Having a good CLS value means a user won’t experience any sudden movements of the content they’re interacting with (text they’re reading, button they’re trying to click).
 Google's Core Web Vitals explained. Source: web.dev
For more details about the specs and possibilities of Core Web Vitals, check out the article from Google Developers.
One additional note from me: I think I don’t need to convince you to take care about improving your metrics, but in case I do, remember: Core Web Vitals can directly affect your pages’ ranking in Google Search results.
Why to use Next.js to improve Core Web Vitals?
Now that we know what we need to improve, let’s see how to approach it. Improvement is by no means a quick process, but we can get a good baseline result if we choose the right tools to build our website.
Next.js, or as it calls itself – “The React Framework for Production” is gaining popularity and respect fast. Next.js gives us hybrid static & server rendering, smart bundling, route prefetching, and more, while being fairly easy to pick up. We can improve Core Web Vitals just by using it properly.
Server-side rendering
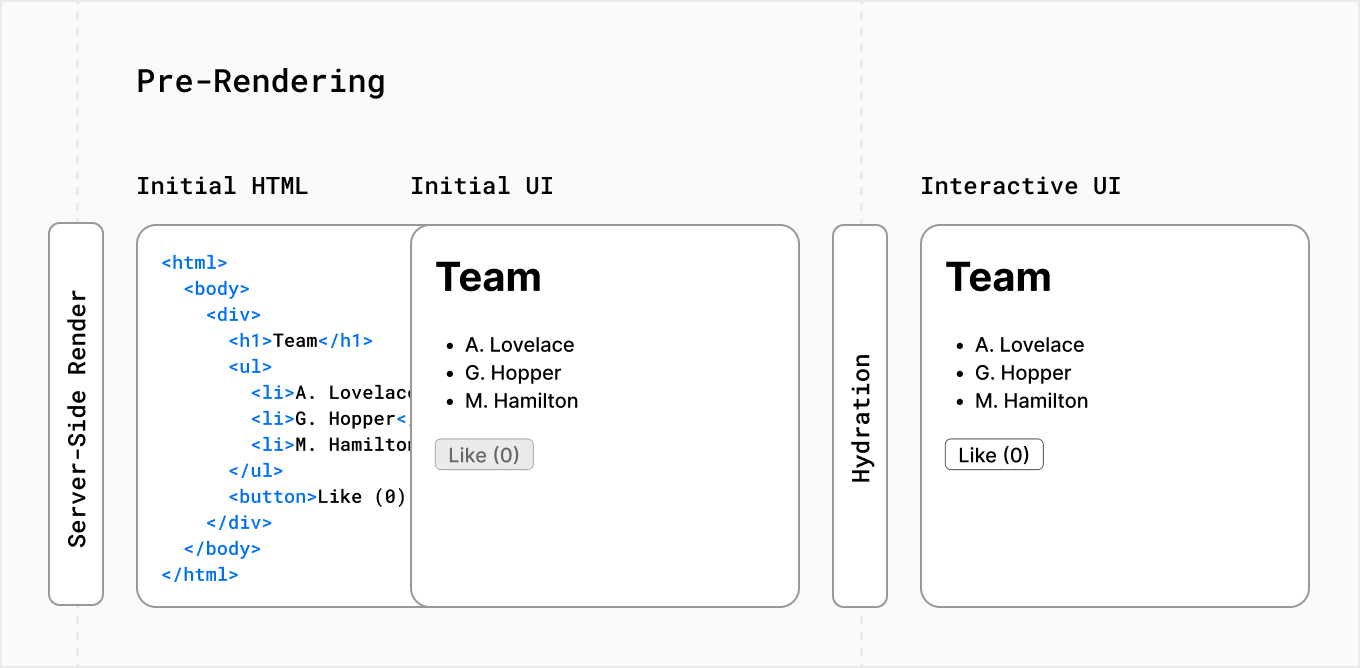
We can start with SSR (server-side rendering). How is it different from how standard Single Page Applications work? Instead of first downloading application’s JavaScript, and then making it render the whole app in the browser, we run the code on the server, passing the already pre-rendered HTML into the browser, which is then hydrated by React.
 Pre-rendering in Next.js Source: Nextjs.org
This alone makes the user perceive loading as faster, since some content is already visible initially. However, main website content is often loaded dynamically via another request to the backend, affecting our LCP score. This can be changed by using data prefetching on the server side. We can get the data during pre-rendering and have a full HTML ready in the browser before the first JS even loads. As a side-effect, this also improves our CLS score.
When content is loaded dynamically, it looks like this: a loader is shown, indicating data fetching, then it’s replaced by actual content when it’s available. Since often the loader doesn’t have the same height as the content, the page will jump a bit after content is shown. When we fetch the data on the server, we get rid of this problem entirely and the user sees everything at once.
Next.js makes this process painless by allowing developers to attach a function to every page, which should pre-fetch all required data on the server. Then it uses this data to render the whole page on the server and sends ready HTML to the browser.
Code-splitting
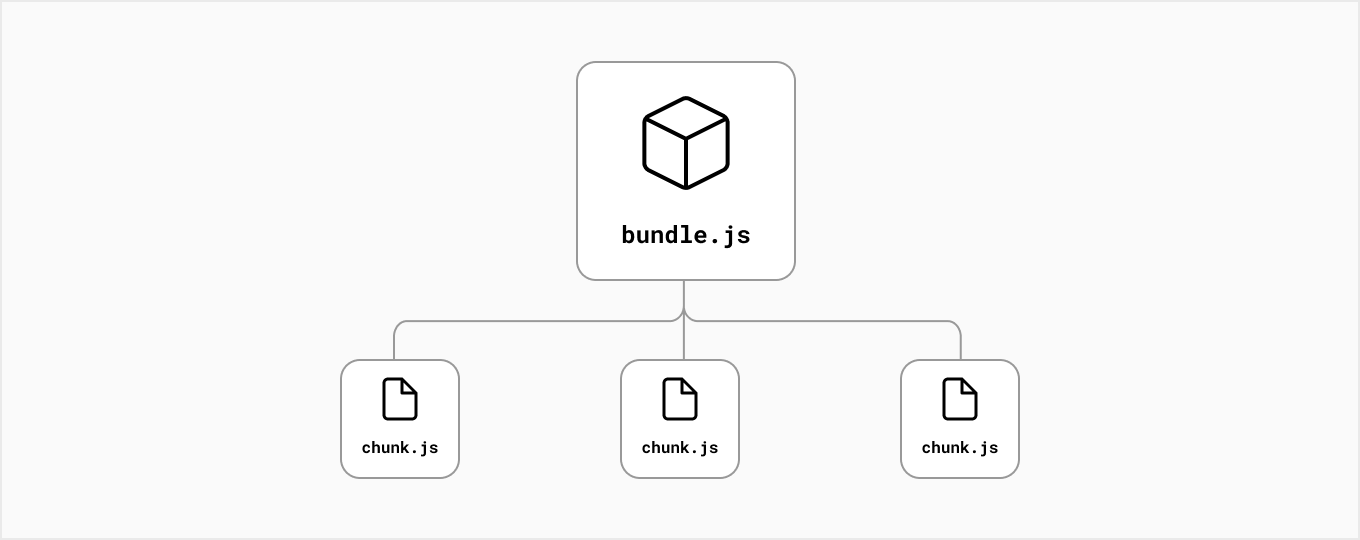
The size of the application’s JavaScript heavily impacts LCP and FID metrics. We can of course make the whole bundle size smaller by carefully selecting external libraries and using techniques like tree-shaking. Besides, we can decrease the size of JavaScript by only loading what’s required for the current page. This technique is called code-splitting and with traditional SPAs it’s a non-trivial task. It can of course be achieved by dynamic lazy imports, but it requires careful planning and remembering to put these imports where possible.
Next.js uses route-based code-splitting which means the user will only need to download JavaScript and CSS required by the current page. All we need to do is to define our routes as files in pages directory and the code-splitting will happen automatically. We can still use lazy imports to delay loading of some heavy components which don’t have to be available immediately after the page’s fully loaded.
 Code-splitting in Next.js Source: Nextjs.org
Optimizing images
Large images can also affect the website’s performance. One way of dealing with this is to optimize them by hand and prepare all the sizes required by the img src set attribute. There are of course some tools that can help you in the process. However, it becomes much harder if your website also allows user-uploaded images and you need to take care of those too, as well as take care of your website’s performance. Next.js can help us in this case by providing an Image component with built-in optimization. All images are automatically resized and compressed before being sent to the browser and if they are an important part of the website our LCP score will likely improve. Lazy loading is supported out-of-the-box, so the images will only be fetched if the user scrolls down to see them. Until it happens, Next.js will show a blurred version as a placeholder.
Tip: As mentioned in the docs, before using it in production it’s important to replace the default image processing library by running yarn add sharp.
What's next for web performance optimization?
What will the future bring in the website performance optimization area? React 18 is already in beta, and with exciting new features like Server-side streaming (sending parts of page gradually as data is fetched and page rendered on server and making important parts of application interactive faster than less important ones) and Server components (whose code is only run on server so they don’t contribute to app’s JavaScript bundle size). Next.js team is working with React developers to make these available as soon as possible, you can already test them. I, for one, cannot wait to try them out.
Improving your website’s performance can take a long time, but you can give yourself a head-start by knowing what to measure and using a framework which will help you achieve a good baseline result.
Check out also
- 6 Reasons Why Your Website is Not Converting - Learn about the most common usability problems that hinder your website's performance.


