


Chapters

Programmers use TDD to take care of the quality and reliability of the code they create and to improve the process of its creation. However, they don't always pay attention to the fact that test writing itself can be more or less optimal.
TDD (Test Driven Development) assumes that you start writing code by creating tests that meet the requirements of the business logic and then you create their implementations in the application code. This assumption seems simple, but in order for this approach to bring as many benefits as possible and to optimize instead of hindering the process, you should stick to its rules and think about things like what you actually want to test, what you require from a given functionality or in what order you will write individual code fragments.
In this article, I will walk you through creating an algorithm for the so-called Game of Life, applying good TDD practices.
The Game of Life rules
The Game of Life was invented over half a century ago by a British mathematician John Conway and its rules are quite simple.
The game is played on a board, which is a grid consisting of any number of squares, which we will call cells. Any cell may be alive (filled with color) or dead (empty). The cells that are surrounding it are its neighbors. During the game, while “life goes on”, so-called ticks happen - cells move to their next state according to the following rules:
- a living cell with fewer than 2 neighbors dies,
- a living cell with 2 living neighbors survives,
- a living cell with 3 living neighbors survives,
- a living cell with more than 3 living neighbors dies,
- a dead cell with 3 neighbors alive comes to life.
The player's role is to design the cell alignment before the first tick.
Below is an example, illustrating the course of the game on a sample board.

In our implementation, the state of our board will be kept in the table of tables, where the indexes of the main table will reflect the rows of the board, and the indexes of the sub-tables in it will reflect the columns (specific cells) of the board.
TDD - do it right or not at all
Start with business logic
Tests don’t need to (and often should not) be written in the order in which the program will run. Using the Game of Life example, you might think that if the first thing the user does in the application is choosing the size of the board (or if there is no such option, then simply displaying it), then it would be appropriate to test such functionalities first. In TDD, however, we start with the business logic itself, which is crucial for the operation of the application.
Test only what's necessary
The first step will be a thorough analysis of the business logic and planning the initial small steps of creating an application. It is also worth making general assumptions of the application before writing tests (such as the use of an array of arrays), which will direct our tests and their implementations on the right track. At each step you should consider what it actually consists of.
Looking at the testing side, we should think carefully about what should be tested at the very beginning. In our application, we work on a board of any size. So let’s consider the following issues:
- Do we have to test the behavior of cells on boards of different sizes?
- How are individual cells different?
After reflection, we can come to the conclusion that the business logic for both the 1x1, 5x5, 20x20 table and any other size can be closed in a 3x3 table, because it includes the cases of each cell, regardless of its location and the number of neighbors. The 3x3 board will contain the middle cell with the maximum number of 8 neighbors, as well as cells on the edges and corners of the board.
Stick with red-green-refactor loop
In TDD, we build the code in small steps, based on the red-green-refactor pattern. This can be difficult, especially if we already know the operation of the entire application and we may think that it will be easier to write a test that will cover slightly more complex functionalities. However, it is worth sticking to TDD assumptions if we want to take advantage of its benefits, such as protection against writing redundant code.
Red phase — force yourself to fail
In the red phase, we always write a test that isn’t supposed to be passed, which may be uncomfortable at first. The test should also be as simple as possible and contain only the necessary code. When writing it, it’s good to have a plan for further tests in the back of your head. Let's also pay attention to the name, which should be precise enough that we will potentially know immediately which test has failed.
We decide that the first test of our application will check if the empty table after the "tick" will remain empty. We also make an assumption that the implementation will create the Board class, taking the current state of the board as a parameter. We can then proceed to writing our first test (we will use Jest for testing):
Green phase — let it work only as much as it should
In the green phase, we implement a given functionality in the simplest possible way - it doesn’t have to be a perfect code yet, so we don’t pay attention to the details yet. We write it so that it doesn’t run forward covering what will happen in the later stages of application development. It is also worth remembering that a well-written test can have many different implementations.
In the green phase, all other already written tests check whether changes in a given place have caused the bug to occur elsewhere.
Although the implementation of the code for our first test will be very simple, already at this stage it is worth considering what our next steps will be and what impact this solution will have on them.
Consider the example below where we finally create a Board class that has a tick method that takes the cells on the board to the next stage of life:
The next step could be e.g. to check the case where we start the game with one living cell, which should die after a tick. So let’s write the second test:
Theoretically everything is fine, the test passes, so the previous implementation seems fine. However, in the context of TDD, unfortunately it is not. Our second test is now successful, even though we haven't made any implementation changes after writing it. This means that our code covers a bit too much functionality and we should adapt it so that it relates as precisely as possible only to the test case under development (the first test with an empty board) . A better solution here will be such as below:
With this implementation our first test is passed, but the second is failed.
And now it’s finally the time to introduce an implementation where the second test passes, and this could be the same one where the tick method returns an empty array. Such going backwards may seem like a waste of time, because in the end we write the same implementation anyway. However, it includes a deep understanding of how our code works and complies with assumptions of TDD. Look at it like this: if we had planned the next test in advance (as TDD says), we could have avoided situations of this type, cause we would have had it in the back of our mind when writing our first implementation fragment.
Refactor phase — time to clean up
In the refactor phase, we clean the existing code and adapt it to the current state of the program. We can make changes to the entire existing code, without worrying about breaking something - we finally have tests for each line of code written.
Then we start the cycle from the beginning until we achieve the goal of full assumed operation of our application.
Go further step by step, not sticking to the initial assumptions - analyze up to date and allow yourself to change your plan
Finally, it's time to test some of the more complicated arrangements of cells on the board than just one living cell dying after a tick. The decision whether we check the operation of the algorithm separately for each type of cell location on the board or whether we test the entire board at once is a matter of preferences of a programmer. We have to decide if the case of each cell is so special for us that it is worth writing 9 individual tests and their implementations, one for each of them. In the example below, we decided to test the entire board at the same time. For this purpose, we will test a few different sample boards before and after tick:
Okay, we have a test (that of course isn't passed), so it's time to write the implementation to it… But where to start? Let's see what we really need to code here. In order for the above test to pass, we have to:
- track each of the cells somehow,
- check whether a given cell is alive or dead,
- count how many neighbors of it are alive,
- make all the rules regarding the fate of a dead or living cell apply to it,
- do all of the above for each cell on the board.
Oops… it looks like A LOT of work to do in just one step of our TDD process. Now we enter the stage of the more advanced business logic of our application and try to cover a much more complex case than before. Do we want to do all these things at once? Or maybe we should rethink our action plan? Let’s think: do we definitely want to continue testing the entire board at this point? Or maybe is there a way to reduce the complexity of the tests and the code itself? Was our original plan so good for sure?
If we think about it, instead of testing the behavior of all the cells on the board after each tick, we could only focus on what happens to a single, specific cell first. This simplifies the test cases and their implementations considerably. So let's not be afraid to start over. Yes - all over again! Contrary to appearances, it can save us a lot of time. Remember: it's not worth going into something that turns out to be not a good solution even after a long time of working on it.
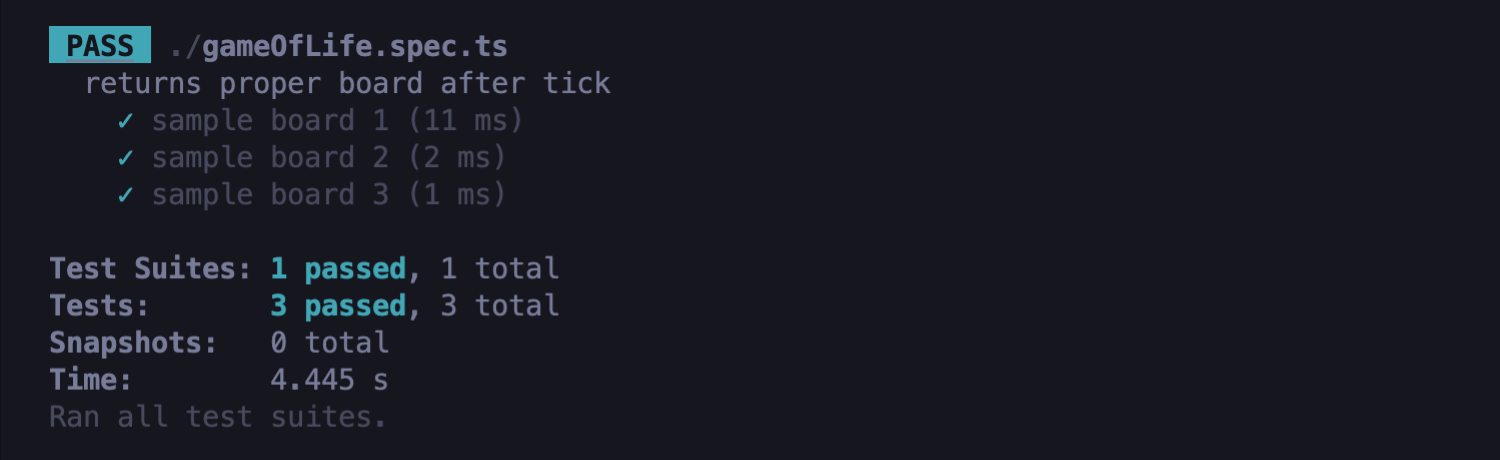
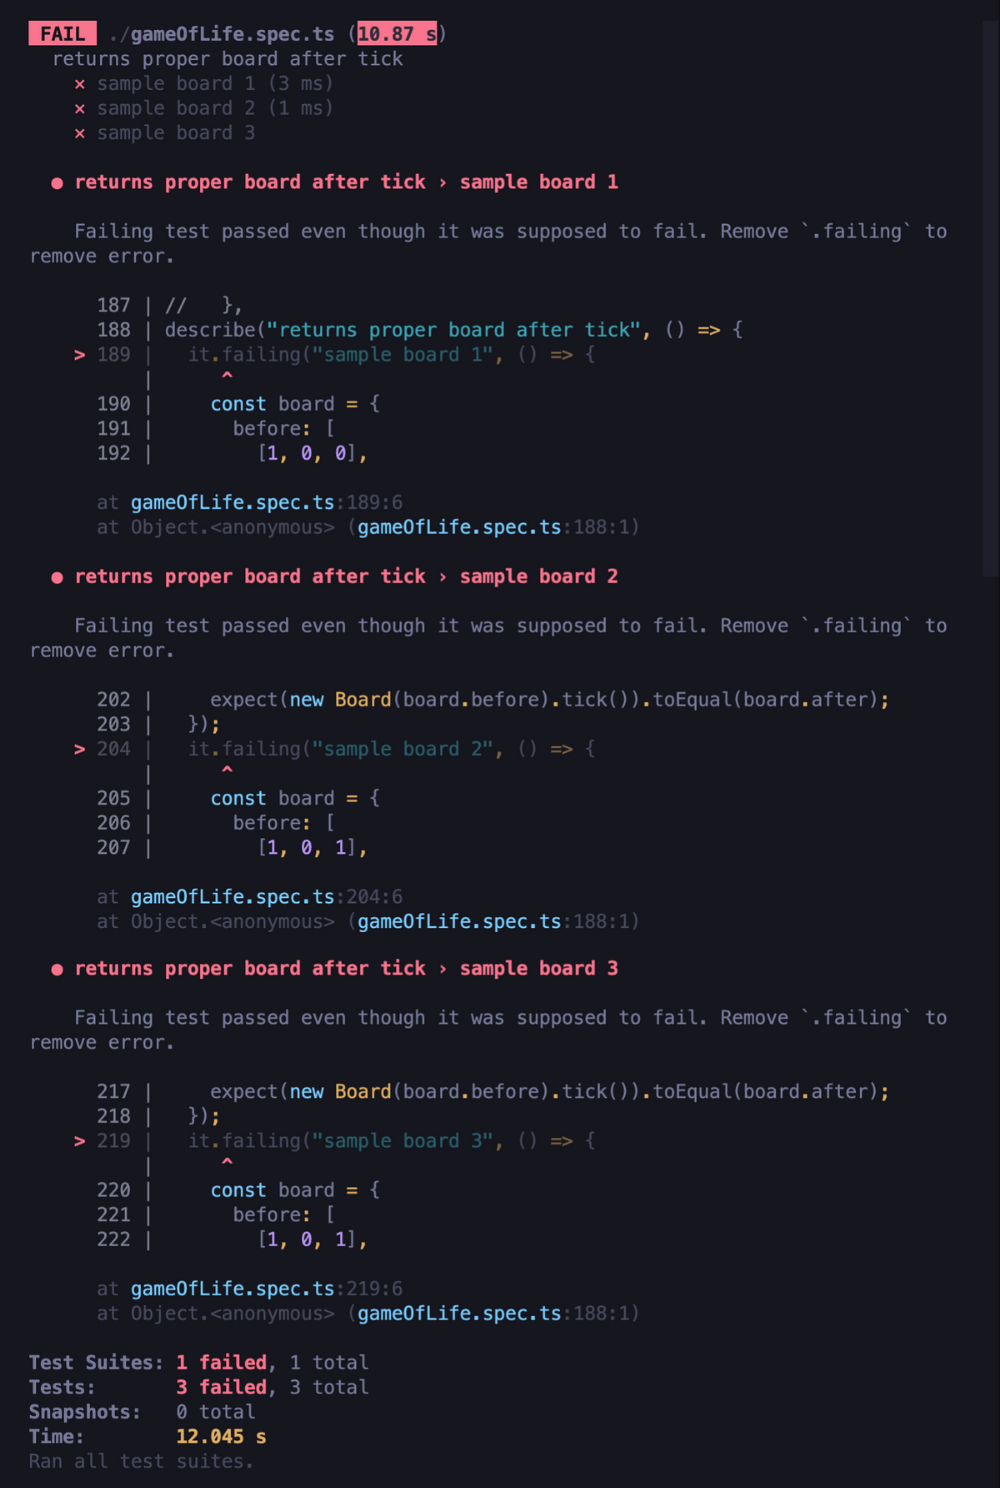
It’s a good moment to use the new .failing feature of Jest. Using it we can make a test that actually crashes, pass. It is useful in situations where we want a given test not to pass for some time, but later to success. We can just leave our test in our test code without using the .skip feature, so that we wont forget about it in the future - we will see exactly when the progressive implementation of our code will cover the case from this exact test - it will just crash then. So let’s use it:
The .failing method doesn’t work together with .each method (and this is a deliberate intention of its creator, as writing many failing tests at once in one test would slightly miss the goal of this feature), so each case will be tested in a separate test. Remember that for the .failing feature to work, You need to use at least version 28.1.0 of Jest and version 28.0.1 of ts-jest. Below is an example of proper devDependencies in package.json:
As you can see, the above tests are passed:
- Here you can read more about .failing feature: test.failing.
Now it's time to find out what factors determine the fate of a single cell after each tick. There are 2 things here: whether the cell is currently alive or dead, and how many neighbors it currently has. We have to consider how to plan the tests. Let's go back to the rules of the game:
- a living cell with fewer than 2 neighbors dies,
- a living cell with 2 living neighbors survives,
- a living cell with 3 living neighbors survives,
- a living cell with more than 3 living neighbors dies,
- a dead cell with 3 neighbors alive comes to life.
How many test cases does it give us? Do we need to test each of the rules separately? Or maybe they could somehow be combined with each other? After a bit more careful analysis of the rules, we can establish that:
- any cell with fewer than 2 neighbors, regardless of whether it is currently alive or dead, will die after a tick,
- every cell with exactly 3 neighbors, regardless of whether it is currently alive or dead, will be alive after the "tick",
- if a cell currently has 2 neighbors, the cell will only be alive after tick if it’s already alive.
And that's it. 3 test cases are enough to cover the entire business logic of a single cell life cycle. The only thing left to do now is to determine the order of the tests, in which each following one will not pass initially. If, for example, we started with the third requirement, in which a living cell with 2 neighbors survives and otherwise not, we would also cover the first requirement with this implementation, which we do not want. The order in which they are listed above prevents this from happening. In the following test, we assumed that we would create a class Cell containing 2 parameters in the constructor: the state of the cell (alive - 1 or dead - 0) and the number of its living neighbors. The first test of course fails, because the class Cell does not even exist at this stage.
When writing the implementation, remember that we want it not to cover the functionality we want to test in the following tests. An example class containing a method to set the state of the cell under test after "tick" would look like this:
For the second requirement, we write another, analogous, initially failing test:
And an implementation that changes the tick method:
And finally test for the third requirement:
With implementation modifying tick method:
At this point, the need to increase the readability of the code is clearly visible, so now we go to the refactor phase, deciding to create additional methods in the Cell class:
Let's finally create an entire array from the cells
We need to apply the methods that the Cell class gives us to the board, which we will describe (as before, before changing the action plan) with the Board class.
Group tests to increase readability
It is really worth it to structure our tests a bit. In addition to putting them all together in one "describe", e.g. "Game of Life", it would be also good to use nested describes here for the "Cell" and "Board" classes. We make such improvements in one of the refactor phases (the sooner the better). In effect, it will look something like this:
Now that we know that the algorithm responsible for the operation of a single cell works correctly, we have to check whether we will enter the correct data into the constructor of the Cell class for each cell on the board.
Before we started our single cell logic approach, we already wrote the test we need now - the one where we used the .failing feature. Now its implementation will be a lot less complicated as we've already managed to cover things like referring to whether the cell is alive or dead, how many neighbors it has, and how it will behave after a tick. The only thing left to do is to transfer this logic to the whole board and use the tick method of the Cell class for each field of it.
Our implementation after the green and refactor phase looks like below. In this example we used the so-called null object pattern, which we will not describe in more detail here, but in short, it is a design pattern that makes a dead entity behave like an empty one, so there is no need to distinguish between them, and this in turn allows you to avoid checking if a given value is different from null. Remember, however, that a good test allows you to use any implementation that differs from each other, so the one below is not the only correct one:
At this point, we can see that our tests of the whole board have finally crashed:
Now we just need to remove the .failing method from all tests above. They all turn out to pass, so we can safely say that we’ve successfully finished our job.
What TDD gave us?
TDD primarily gives us the ability to write piece by piece the well-functioning code and control it throughout the development and refactoring process, thanks to the 100% coverage of code.
TDD also changes the approach to programming itself. When using it, we struggle primarily with covering the business assumptions and not with problems arising from the code itself. This gives us a chance (or even forces) a thorough analysis of the requirements and constant verification of them during the application development process, which, as presented in the Game of Life example above, may save you from writing a lot of redundant code.
Although TDD still doesn’t convince everyone and is sometimes considered as a waste of time among many developers who haven't used it before, it is worth - fashionably speaking - getting out of the comfort zone and trying to apply it in your daily work, because the initial torments of using it will eventually turn into more efficient work, better code quality, and much less frustration with searching for bugs in your code.
Check out also
- How to improve Core Web Vitals using Next.js? — Next.js gives us hybrid static & server rendering, automatic code-splitting, image optimization, and more, while being fairly easy to pick up. You can improve Core Web Vitals just by using it properly.
You may also like
The Product Health Check: How to Find Performance Bottlenecks Before They Cost You Users
5 July 2026 • EL Passion

Staff Augmentation vs. Managed Teams: Which Model Saves You More on Long-Term Overhead
5 July 2026 • EL Passion
The Cost of Waiting: How Refactoring Your Legacy App Prevents Massive Technical Debt in 2026
31 May 2026 • EL Passion
We’re available for new projects.
