


Chapters

In the previous part, we developed a simple movie database app in Next.js. It's time to add authentication. Learn how to add basic authentication to your movie app.
Lastly, we created an app with two lists: recommended movies and gaining popularity movies, and a simple form to create movies. Everyone could view lists of movies, but also everybody could add a new movie. Now, we would like to allow this to only logged-in users.
What’s NextAuth.js?
NextAuth.js is a library that makes the authentication process easier and faster. It supports Google, Facebook, Apple, and more popular services. It can be used both on the client side in components and in API routes. It’s easy to use and flexible. To get started you only have to install it in your project and add one file so Next.js will generate special endpoints and logic. After that, you are free to use it.
Prepare registration endpoints that will connect to Airtable
Add users table
Firstly, go to the Airtable dashboard, select the previously created database, and add a new table ‘users’ for storing user data.
We need the following columns:
- email - email
- userName - single line text
- passwordSalt - single line text
- passwordHash - single line text
- role - single select with options: user and admin
- createdAt - created time with 24-hour time format (it will be added automatically when adding a new record)
- updatedAt - last modified time with 24-hour time format (it will be updated automatically with every record update)
You can delete empty records that were added to the table by default.
Creating user validation schema
Let’s add a schema for creating user objects so we can later use it to validate our user on the backend side. We need only email, password, and userName. You can add more complicated validation if you want. Export also a type, we will use it in sign up form view.
Creating user endpoint
Let’s create a file createUser.ts in the /src/services/users directory. Firstly, we would like to validate data from the form. We will keep the password in the database - it has to be secure. We will hash passwords with extra randomness - salt. You can put functions needed for password hashing in utils if you want. After preparing hashed passwords we will simply create a record in our database. We also would like to pass the role as ‘user’ by default, maybe sometime later we will need different roles for our users so better to be prepared.
One more thing left to do here. Only one user with a specific email should exist in the database. Let’s create a function that will get user by email.
Now inside createUser.ts we will add a helper function that will throw an error if the user already exists. Then we will call that function just after validating the user schema.
We have a function that will insert a user into the database and throw an error if such a user exists. The next step is creating a proper API route. Inside /src/pages/api/user create file index.ts and add usersHandler function. At this moment we will only handle POST requests. We have to add some error formatting to show it nicely on frontend.
Create registration page
The backend is prepared, so let’s focus on the frontend part. To make it a little bit faster, copy adding a movie form with whole logic to /src/pages/users/register.tsx. Modify it so it will have email, userName, password, and confirmPassword fields. In handleSubmit, we will get proper fields from the form and call API to create the user. Before the API call we also have to check if the passwords match just like in every register form.
Now you can go to your browser and check if on localhost:3000/users/register you can see the registration form and if it works properly. New users should appear in your table.
Add registration and login with NextAuth.js
Firstly, let’s install a library called next-auth and go through the getting started section in NextAuth docs.
yarn add next-auth
Add authorized user validation schema
Before adding NextAuth configuration let’s add a schema for authorizing user objects so we can later use it for validation of credentials on the backend side.
Prepare authorized user endpoint
Now, let’s create a function that will authorize our user. We will connect to our database, check if the user exists, and then validate the password (check if it matches the password from the database). If everything is correct we will return the email, userName, and role.
In the src/pages/api/auth we have to create file [...nextauth].ts to let NextAuth know which providers we want to use. We want to authorize users by email and password, so we put the credentials provider here. When someone will log in with an email and password Next will automatically pass credentials to authorize function. Then we will check if we can authorize the user (if the user exists, password is ok, etc.).
We also want to add some data to a JSON web token. NextAuth has some properties by default but we want the userName, role, and user ID from Airtable. We have to do that inside the JWT callback, it will run under the hood in NextAuth when the JSON web token is created. What is more, we want to have access to the user role inside the session, so inside the session callback let’s add a user role and ID parameters.
What’s more, let's add a new environment variable called NEXTAUTH_SECRET and add it to the next auth config. To generate your secret, you can use OpenSSL command.
openssl rand -base64 32
Create login page
Great, the backend part is done, let’s go back to the frontend. Let’s add a login page - create login.tsx file inside /src/pages/users and copy-paste paste register.tsx content. Leave only email and password fields, I’ve also added some text and a button to redirect to the registration page. Now, modify the handleSubmit function. Instead of directly calling our API we will use the SignIn function from next-auth. We have to pass credentials and handle responses from the next-auth.

We have prepared registration and login forms. Now, it’s time to modify the application's top bar a little bit to show if the user is logged in or not. We will use the useSession hook to retrieve session data. If a session exists we know that the user is logged in, so we will change the buttons to Login/Logout. You can also show the user's email somewhere.
One more thing to add. If we want to use hooks like useSession we have to wrap our application with Provider from next-auth. Go to src/pages/_app.tsx and add the provider.
Now, go to your browser and check if you can register a new account, log in, and log out.
Let’s go back to Airtable and add a connection between movies and users. Open the movies table and add a new column, choose “Link to another record” and select “users”. Create a field and in the lookup fields modal select email and userName. Assign users to existing movies.
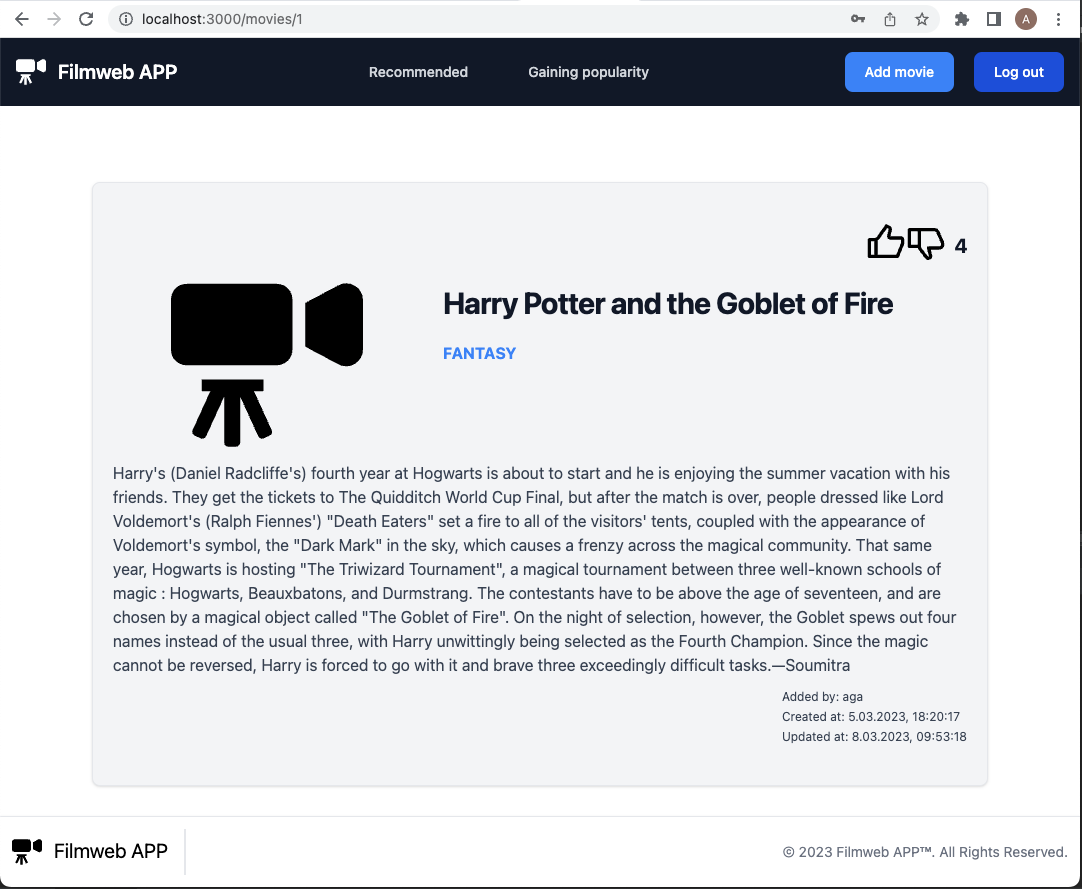
Now you can update MovieDto and update retrieving movies from Airtable so that somewhere, for example in movie details, you can show “Created by: XYZ”.
Disable adding a movie form for unauthorized users
We would like to disable adding movies when someone is not logged in. To do so, let’s go to the /src/pages/movies/new.tsx and use a session hook. We need session data and status. Then each time the session and status will change we check if the session does not exist and the status is not loading. If the answer is yes we redirect the user to the login form. You can also add some spinner or loading text to prevent showing the form to the user.
Ok, so we have secured our form on frontend. Now, let’s go to the backend and make our API also secure. Go to pages/api/movies/index.ts. Firstly, we will get a session and by adding a request as param next-auth, based on cookies, headers, etc., can determine if the session exists. If it does not exist we will simply return status 401 - user not authorized.
We would also like to connect movies with users. So pass the user ID to createMovie function and assign this ID to users.
Go to the browser and try adding movies. You can use a Postman or some plugin inside your IDE to check if backend validation works.
'Like' button for authorized users
We have everything prepared so we can add one more small functionality available only to authorized users - “giving likes”. When the user presses the button we would like to add or remove like' from a particular movie. To make it simpler we won’t check whether the user has already given 'like”. You can save a user's likes list somewhere and make it if you want.
Let’s get started by implementing endpoints in API routes. We would like to handle requests that users make on a particular movie, for example, PUT /api/movies/1, /api/movies/6, etc. We also have to update the object returned by the getMovieByID function so it contains the ID from Airtable.
To handle all requests for different ids create file [id].ts inside /src/pages/api/movies. At the beginning, we have to check the session. If something is wrong we will throw an error. Otherwise, we will get a movie by ID to get its Airtable ID (needed for updating). We should probably also check if the number of likes is only 1 different, you can add it if you want, I’ll leave it like this. After that, we can update the movie in the database.
Create an updateMovie.ts file inside src/services/movies. Here we need to connect to an Airtable and update the record.
Remember about adding schemas needed for payload validation.
Now everything is prepared, so go to the movie details page and add some code to give authorized users the possibility to like or dislike the movie. Firstly, we have to check if a session exists and then show 2 buttons (like and dislike), otherwise, we will show only the like button and a number of likes. We also need a function that will handle change and make calls to our API, remember to add movie ID to the API route.
Summary
We have just added authentication to our app. It's a really important part of every project, if not the most important.
You have to remember to keep your resources secure. Also, remember to protect paths and routes (like adding a movie page) from access by unauthorized users. This is just as important as protecting API endpoints.
What to do next? You can add much more functionalities to this simple app. Firstly, you can create a “My movies page” where you can show movies added by this particular user. Secondly, maybe edit form or the possibility to delete movies. What’s more, we’ve prepared user roles, so you can add a simple admin panel. Admin could approve the movie before it will be shown to other users. As you can see, I’ve listed only a few examples and there is still much to do. Good luck!
Check out also:
- Next.js - What Is It and Why Should We Use It? — See the pros and cons of using Next.js to decide if it's the right fit for your next project.
- Why is /App Directory a Big Step for Next.js? — Learn about the latest updates and changes in NExt.js
You may also like


We’re available for new projects.
